Subway Tiles Polished
Reflective
Elegance and Luminous Shine
Design Style Coordination and Aesthetic Pairings
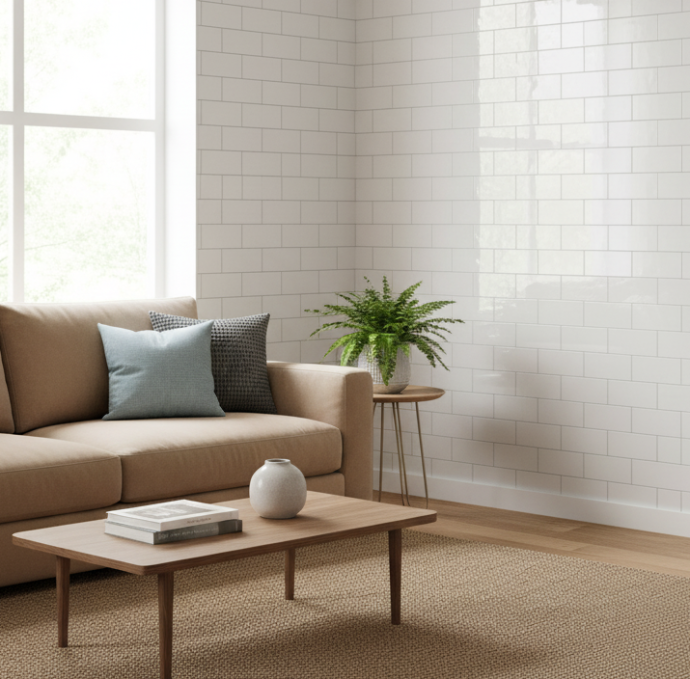
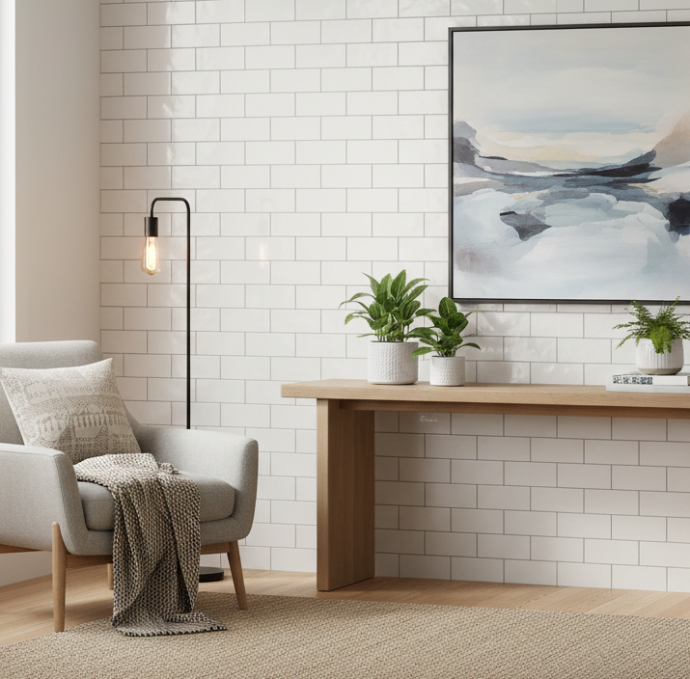
When selecting subway tiles polished for your project at Nova Tile and Stone, understanding how the reflective finish coordinates with different design styles helps create cohesive spaces. The high-gloss surface adapts across multiple aesthetics through strategic pairing with complementary materials and finishes.
Modern minimalist kitchens benefit from white
polished tiles paired with handle less flat-panel cabinetry, stainless steel
appliances, and quartz countertops. The reflective surfaces amplify clean-lined
aesthetics while adding dimensional interest through light play,
though some designers opt for 3D subway tiles to create even more dramatic textural depth.
. Traditional
designs pair polished tiles in classic white with raised-panel cabinetry,
marble or granite countertops, and oil-rubbed bronze fixtures where the polished
finish adds brightness without compromising timeless appeal.
For homeowners who appreciate shine but want reduced maintenance compared to fully polished surfaces, lappato subway tiles offer a semi-polished finish that's easier to maintain.
Transitional spaces leverage polished tiles as neutral elements connecting contemporary and traditional components. Grey polished options work beautifully with shaker-style cabinets, quartz countertops, and classic pendant lighting. Industrial aesthetics embrace polished tiles in charcoal, navy, or black paired with exposed brick, concrete countertops, and matte black fixtures where high-gloss creates dramatic contrast against deliberately rough textures.
Professional Installation vs DIY
Considerations
Once design direction is established, homeowners face practical decisions about installation approach. Subway tiles polished demand higher precision than matte alternatives due to reflective surfaces magnifying installation imperfections, making the choice between professional contractors and DIY execution particularly consequential for final appearance quality.
Professional installers bring specialized equipment including laser levels for substrate evaluation, tile leveling systems preventing lippage between adjacent tiles, and wet saws producing clean cuts without chipping polished edges. Experienced contractors recognize when substrate conditions require remediation before tiling begins, ensuring every surface irregularity gets addressed since polished installations make imperfections visible through light reflection patterns.
DIY installations work for homeowners with previous tiling experience, proper tools, and realistic time expectations. Polished tile projects require double the preparation time compared to matte tiles, extra hours spent perfecting substrate flatness prevent disappointing results. Rent professional-grade equipment rather than relying on basic homeowner tools, and budget additional materials for practice cuts since polished tiles show chips more prominently than textured alternatives.
Long-Term Performance and Future
Decisions
After installation completes and daily use begins, subway tiles polished enter their functional lifespan where performance depends on maintenance consistency and environmental conditions. Reflective finishes maintain their mirror-like quality for ten to fifteen years under normal residential use with proper care, though dulling may occur sooner in high-traffic settings or homes with hard water issues causing mineral buildup.
Single cracked tiles warrant replacement when surrounding tiles remain in excellent condition. Purchase extra tiles during initial installation and store them for future repairs, as finding exact matches for discontinued products proves challenging years later. Widespread dulling from accumulated micro-scratching sometimes responds to professional refinishing services that re-polish surfaces using specialized equipment, extending installation lifespan another five to ten years at costs significantly below replacement.
Complete replacement becomes necessary when multiple tiles show damage, grout has deteriorated beyond repair, or substrate issues cause tiles to loosen from walls, situations where piecemeal repairs no longer provide cost-effective solutions compared to comprehensive renovation.
At Nova Tile and Stone's shop tiles by type collection, you'll find subway tiles polished in various materials delivering luminous sophistication where understanding design coordination, installation approach, and long-term performance expectations ensures successful projects with lasting reflective beauty.
Polished subway tiles require impregnating or penetrating sealer application before grouting because the mechanical polishing process creates microscopic surface pores that can absorb grout pigments. Without pre-grouting sealer, these pores allow grout color to penetrate the tile surface, causing permanent discoloration that cannot be removed through cleaning. The sealer fills these microscopic pores and creates a protective barrier, preventing grout absorption while maintaining the tile's reflective finish. This step is essential for polished and honed tiles but not required for fully glazed tiles.
Polished finishes are created through mechanical grinding and buffing that removes natural texture and partially closes surface pores, resulting in a mirror-like shine on the tile body itself. Glossy glazed finishes involve applying a glass-like coating over the tile surface that is then fired, creating a completely non-porous sealed surface. Polished tiles require sealing before grouting due to their microscopic pores, while glazed tiles typically do not. Polished finishes can be susceptible to etching from acidic cleaners, whereas quality glazed surfaces resist chemical damage better.
Grout color for polished subway tiles must match the tile's predominant color to prevent visible staining issues. Because polished surfaces have microscopic pores even after sealing, any grout color contrast becomes more apparent and permanent than on glazed tiles. Light-colored polished tiles require white or cream grout, while darker polished tiles need charcoal or matching dark grout. Contrasting grout colors that work beautifully on glazed tiles will cause discoloration problems on polished surfaces, as the reflective finish magnifies any staining or pigment absorption.
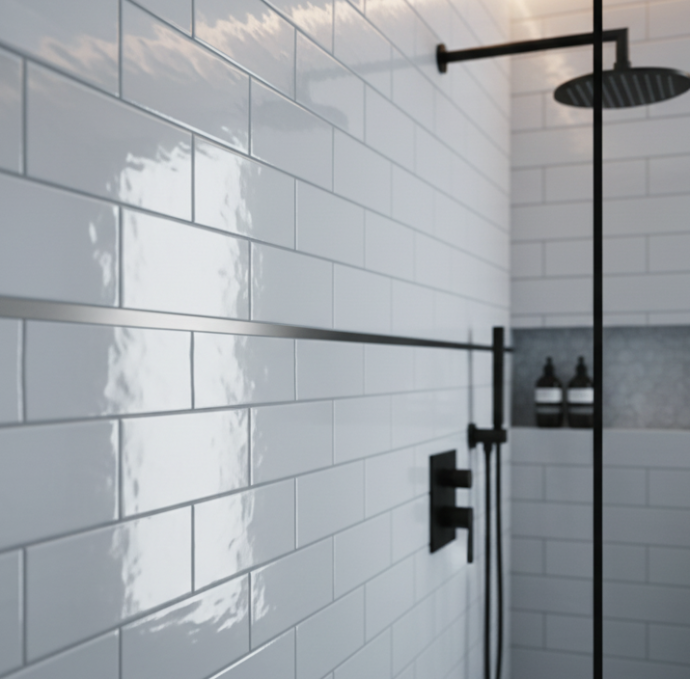
Polished subway tiles can be used in shower surrounds but require extra maintenance considerations compared to matte or glazed alternatives. The polished surface shows water spots, soap scum, and mineral deposits more readily than other finishes, requiring frequent cleaning to maintain appearance. Regular resealing is essential to protect against moisture penetration through the microscopic pores. Additionally, polished surfaces can become slippery when wet, making them suitable only for walls, never for shower floors. Many homeowners choose matte or textured finishes for showers to reduce maintenance demands.
Clean polished subway tiles exclusively with pH-neutral cleaning solutions designed for natural stone or polished surfaces. Avoid acidic cleaners including vinegar, lemon juice, or any products containing citric acid, as these will etch and dull the polished finish permanently. Never use abrasive scrubbers or harsh chemicals that can scratch the smooth surface. For daily maintenance, wipe with warm water and mild pH-neutral soap using a soft cloth or microfiber pad. Water spots and fingerprints require more frequent attention on polished surfaces compared to matte tiles, but the smooth finish makes routine cleaning straightforward when using appropriate products.