Subway tiles come loose primarily due to inadequate surface preparation, incorrect adhesive application, or moisture penetration behind the installation. When the substrate isn't properly cleaned, leveled, or primed before tiling, the bond between tile and wall deteriorates over time, resulting in hollow-sounding tiles, visible cracks, or complete detachment. Understanding these failure mechanisms helps homeowners avoid expensive repairs and ensures their subway tile layouts maintain structural integrity for decades.
Multiple factors contribute to tile adhesion failures, including improper substrate conditioning, wrong thinset formulas, rushed curing schedules, and excessive structural movement. Whether you're executing creative backsplash ideas with herringbone subway tile backsplash designs or simple vertical subway tile arrangements, preventing loose tiles starts with understanding installation science and sourcing professional-grade materials from established tile retailers who maintain inventory specifically engineered for lasting adhesion performance.
This guide examines the specific factors causing tile failures, explains prevention techniques during initial installation, and identifies warning signs that indicate developing problems before they escalate into full replacement projects.
Poor Substrate Preparation Creates Adhesion Failures
The foundation layer underneath your tiles determines whether installations last five years or fifty. Painted drywall, cement backer board, old plaster, or existing ceramic surfaces each demand specific preparation steps that rushed installations commonly skip. Paint, dust, grease residue, or soap film create barrier layers preventing thinset from bonding chemically with the substrate material.
Uneven walls concentrate stress on individual tiles rather than distributing weight across the entire field. Professional installers use straightedges and levels to identify variations exceeding 1/8 inch over ten feet, then apply leveling compounds to create uniform planes. This preparation step takes hours but prevents years of maintenance headaches.
Moisture in substrates causes another category of failures. Installing tiles over damp surfaces traps water between layers, preventing proper curing and creating conditions for mold growth. Using moisture meters prevents installing tiles over substrates that haven't reached acceptable moisture content levels. When working with porcelain subway tiles, proper substrate moisture control becomes especially critical because these dense tiles don't allow trapped moisture to escape.
Structural movement in walls undermines even perfect installations. Using appropriate backer boards rather than standard drywall in high-stress areas provides dimensional stability that prevents tiles from popping loose. Following NKBA installation guidelines for proper substrate selection eliminates most movement-related failures before they occur.
Wrong Adhesive Selection Compromises Bond Strength
Thinset mortar comes in dozens of formulations, each engineered for specific tile types, substrate materials, and environmental conditions. Using wall tile mastic in shower areas guarantees failure because these adhesives break down with constant moisture exposure. Modified thinset contains latex or acrylic polymers that increase flexibility and water resistance compared to unmodified versions.
For colored subway tile installations in kitchens and bathrooms, modified formulas provide the moisture protection these areas require. Reading manufacturer specifications prevents using economy adhesives in applications requiring premium performance characteristics. Mixing ratios dramatically affect thinset performance. Adding too much water creates weak, porous adhesive that never achieves full strength.
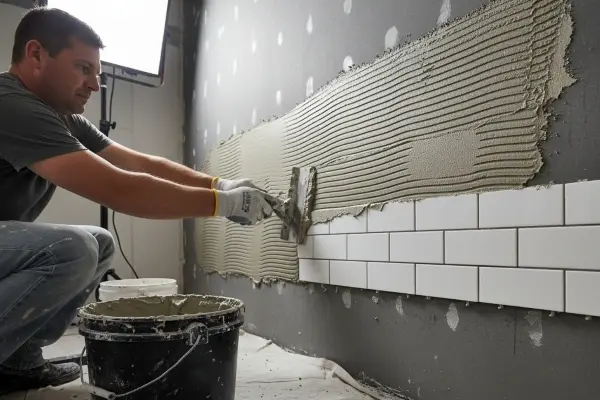
Application techniques matter as much as adhesive selection. Notched trowels create ridges that collapse when tiles press into place, establishing mechanical bonds between materials. Subway tile with dark grout requires 95% coverage to prevent shadowing where voids show through grout lines. Applying thinset to both the wall and tile back (called back-buttering) guarantees complete coverage that prevents future failures. Learning proper tiling techniques from certified instructors prevents common application mistakes.
Moisture Intrusion Destroys Subway Tile Installations Over Time
Water infiltration represents the most destructive force affecting tile installations. Even small amounts of moisture reaching the substrate through grout joints or failed waterproofing membranes cause progressive deterioration. Freeze-thaw cycles in cold climates multiply damage as trapped water expands when freezing, creating internal pressures that exceed tile bond strength.
Bathroom installations face constant humidity that tests waterproofing systems. Shower areas require complete waterproof membranes extending beyond the wet zone to prevent moisture migration. Using only cement backer board without proper membrane protection invites moisture penetration. Polyethylene sheeting, sheet membranes, or liquid-applied waterproofing products create barriers preventing water from reaching adhesive layers.
Improperly sealed grout joints allow water penetration that undermines installations from within. Proper grouting techniques include complete joint filling without voids, adequate curing time before sealing, and maintenance schedules ensuring continued protection. Epoxy grout provides superior water resistance for critical areas but requires precise installation techniques.
Plumbing leaks behind walls create hidden moisture problems that remain undetected until tiles start falling off. When planning subway tile bathroom trends installations, building redundant moisture protection into wall assemblies prevents catastrophic failures from inevitable plumbing issues.
Temperature and Environmental Factors Affect Tile Stability
Installing tiles in extreme temperatures prevents proper adhesive curing. Cold conditions below 50°F slow chemical reactions in thinset, while hot conditions above 90°F cause rapid water evaporation before cement particles fully hydrate, creating weak, chalky bonds. Professional installers maintain temperatures between 65-75°F during installation and for 72 hours afterward to ensure optimal curing.
Thermal expansion creates stress in tile assemblies as materials expand and contract with temperature changes. Expansion joints around perimeters and at field changes accommodate these movements without loading tile bonds. Omitting expansion joints in large fields causes tiles to buckle or delaminate during temperature cycles.
Direct sunlight exposure accelerates installation failures through UV radiation degradation and extreme temperature swings. Tiles installed in outdoor applications require freeze-thaw resistant materials and specialized installation methods. When selecting tiles by size, considering environmental factors helps match products to specific installation conditions.

Installation Technique Errors Lead to Premature Failure
Rushing installations guarantees future problems. Thinset requires specific open times and set times. Exceeding open time means tiles bond to skinned-over adhesive that has already begun curing, creating weak mechanical connections rather than proper chemical bonds.
Improper tile spacing creates multiple problems. Standard subway tile installations use 1/16" to 1/8" joints that balance aesthetic preferences with structural requirements. Using calibrated spacers throughout installations ensures consistent joints that perform reliably. Modern subway tile patterns like chevron subway tile or basketweave subway tile require precise spacing to maintain pattern integrity.
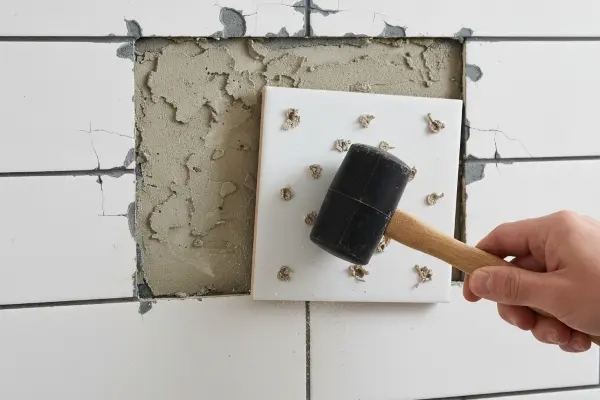
Failing to remove spacers before grouting traps plastic within grout joints, creating weak spots. Grouting before thinset fully cures loads immature adhesive bonds, potentially displacing tiles. Professional installers mark tiles that sound hollow during installation and either reset them immediately or flag them for monitoring. When working with specialty products like the 3D decorative subway tile, modified techniques accommodate dimensional variations.
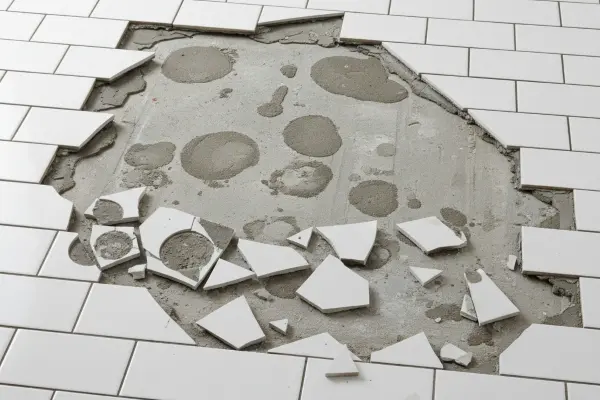
Warning Signs That Indicate Developing Tile Problems
Hollow sounds when tapping tiles indicate voids in the adhesive layer where proper bonds never formed or have already failed. Using the wooden handle of a screwdriver to tap across tile fields reveals problem areas that sound distinctly different from properly bonded sections. Addressing hollow tiles early prevents water infiltration that would expand problems to adjacent areas.
Cracked grout joints signal movement exceeding the joint's capacity to accommodate stress. Isolated cracks might indicate minor settling, while systematic cracking patterns suggest structural issues requiring investigation. Regrouting without addressing underlying causes simply delays inevitable failures. Visible efflorescence (white powder deposits) indicates water moving through tile assemblies, proving waterproofing has failed and requires immediate attention.
Tiles that have shifted position or show lippage (edges higher or lower than adjacent tiles) indicate bond failure or substrate movement. Even slight variations create trip hazards and accelerate deterioration as uneven surfaces concentrate stress. When noticing these signs in existing installations, browsing products by type helps identify suitable replacement materials for repair sections.
Professional Installation Versus DIY: Risk Assessment
Hiring certified tile installers costs more upfront but eliminates most common failure causes. Experienced professionals understand substrate preparation requirements, adhesive selection criteria, and proper application techniques that DIY installers often miss. The National Association of the Remodeling Industry emphasizes that proper installation pays dividends through decades of trouble-free performance.
DIY installations succeed when homeowners invest time learning proper techniques before starting projects. Taking tile installation courses, studying manufacturer instructions, and practicing on small test areas builds skills necessary for successful results. Simple kitchen backsplashes with subway tile kitchen ideas represent manageable DIY projects, while complex shower installations challenge even experienced amateurs.
Quality materials from established tile suppliers provide consistent products meeting specifications, unlike bargain materials with wide variation in dimensions. Installation warranties vary dramatically between professional and DIY work. Certified installers often guarantee labor for years, while DIY installations carry no such protection, making homeowners financially responsible for correcting mistakes.
Proper Maintenance Extends Installation Lifespan
Regular sealing of grout joints prevents moisture infiltration that causes long-term damage. Penetrating sealers require reapplication every 1-3 years depending on traffic levels and water exposure. Testing whether grout still repels water (droplets should bead rather than absorb) indicates when resealing becomes necessary. Neglecting this simple maintenance allows water damage that eventually requires complete reinstallation.
Cleaning products affect tile longevity significantly. Acidic cleaners etch grout and can damage some tile surfaces, weakening protective materials. Using pH-neutral cleaners designed specifically for tile maintains surfaces without causing chemical degradation. Avoiding excessive water during cleaning prevents saturating grout joints and substrates that might have minor imperfections.
Addressing damage immediately prevents small problems from escalating. Replacing single cracked tiles costs little compared to ignoring damage until moisture infiltration damages substrates requiring extensive repairs. Keeping spare tiles from original installations ensures perfect color matches for future repairs. Understanding renovation fundamentals helps homeowners make informed decisions about repair versus replacement approaches.
Monitoring expansion joints and perimeter sealants ensures these critical elements continue functioning properly. Caulk joints dry out and crack over time, requiring periodic renewal to maintain waterproofing and accommodate building movement. Silicone caulk typically lasts 5-10 years before requiring replacement, though exposure conditions affect longevity.
Choosing Quality Materials Prevents Future Problems
Factor | Budget Materials | Professional-Grade Materials |
Dimensional Consistency | ±2mm variation | ±0.5mm variation |
Bond Strength | Standard adhesion | Enhanced polymer modification |
Moisture Resistance | Basic water tolerance | Complete waterproof capability |
Warranty Coverage | Limited or none | Extended manufacturer backing |
Long-Term Performance | 5-10 years typical | 20-50 years expected |
Tile quality directly impacts installation longevity. Premium products like 3x12 matte porcelain subway tile feature consistent dimensions, uniform thickness, and quality control ensuring every piece meets specifications. Budget tiles often exhibit size variations requiring extra cutting and shimming during installation, creating opportunities for adhesion problems. Investing in quality materials from local showrooms eliminates variables that cause installations to fail regardless of installer skill.
Grout quality matters as much as tile selection. Polymer-modified grouts resist moisture better than basic formulas while providing flexibility that accommodates minor movements without cracking. Specialty grouts for specific applications (epoxy for showers, latex-modified for floors) provide performance characteristics matching installation demands.
Substrate materials form the foundation for successful installations. Fiber-cement backer boards offer superior dimensional stability and moisture resistance compared to standard drywall. Waterproofing membranes designed specifically for tile installations provide insurance against moisture problems. Adhesive quality varies dramatically between manufacturers and product lines. Professional-grade thinsets contain precisely engineered polymer modifications that improve bond strength, flexibility, and moisture resistance.
Repair Approach Comparison
Complete Removal and Reinstallation
Pros: Addresses all underlying issues, fresh start with modern materials, warranties on work
Cons: Highest cost, most disruptive, requires fixture removal, generates waste
Spot Repairs of Failed Sections
Pros: Lower cost, minimal disruption, preserves unaffected areas, quick completion
Cons: Color matching challenges, doesn't address problems in unrepaired areas, visible patches
Waterproofing Injection
Pros: Non-destructive, relatively inexpensive, extends installation life, preserves appearance
Cons: Doesn't fix structural issues, temporary solution, not suitable for all failure types
Step-by-Step Prevention Checklist for New Installations
Step 1: Substrate Assessment and Preparation Verify the substrate is appropriate for tile installation and properly supported. Check for level within 1/8" over 10 feet. Remove all contaminants including paint, wallpaper, grease, and dust. Apply primers as specified by adhesive manufacturers. Install waterproofing membranes in moisture-prone areas extending beyond wet zones.
Step 2: Material Selection and Acclimation Choose tiles, adhesives, and grouts specifically formulated for your application conditions. Verify all materials are from the same production batch and meet industry standards such as the ANSI A137.1 specifications for ceramic tile. Allow materials to acclimate to installation environment for 24-48 hours before use. Confirm products are within shelf life and haven't been exposed to freezing temperatures.
Step 3: Proper Adhesive Application Mix thinset to exact specifications using calibrated measuring equipment. Apply adhesive in sections small enough to complete within open time limits (typically 20-30 minutes). Use notch trowel sizes matched to tile dimensions. Back-butter larger tiles to ensure 95% coverage. Periodically pull test tiles to verify proper adhesive transfer.
Step 4: Installation Quality Control Set tiles with firm, even pressure using appropriate techniques. Check for level regularly throughout installation. Ensure consistent grout joint spacing using calibrated spacers. Allow adhesive to cure fully before removing spacers and beginning grout application. When planning vertical subway tile or basketweave subway tile patterns, confirm layouts work mathematically before committing to adhesive.
Step 5: Finishing and Curing Follow manufacturer-specified curing times between tiling and grouting. Apply grout completely filling all joints without voids. Clean excess grout promptly but gently to avoid disturbing fresh installations. Allow complete curing before exposing to moisture or heavy use. Seal grout joints after proper curing period.
Looking Toward Prevention Rather Than Repair
Preventing tile installation failures delivers better results than even the most skilled repair work. Understanding causes helps homeowners make informed decisions during initial installations rather than learning expensive lessons through premature failures. Whether planning subway tile layouts for kitchens, bathrooms, or other areas, investing in proper substrate preparation, quality materials, and skilled installation pays dividends through decades of maintenance-free performance.
Northern Nevada and Northern California residents can explore extensive tile selections and receive expert installation guidance at Nova Tile and Stone's showrooms in Reno, Sparks, Carson City, and Sacramento. The company's experienced staff helps customers navigate material selections, understand installation requirements, and connect with qualified professionals ensuring projects succeed. With free $1 samples, complimentary design consultations, and an inventory spanning tiles by color, style, and application, Nova Tile and Stone provides resources needed for successful installations.
Browse the complete product collection to discover options suited to your specific project requirements. From classic selections like Perfection 2.5x8 matte porcelain subway tile to contemporary choices including terrazzo mosaic tiles, the showroom inventory helps bring design visions to reality. Learning about decorative backsplash techniques and proper material selection empowers homeowners to make confident decisions.
Visit any showroom location or contact the team to discuss your project requirements and receive personalized recommendations ensuring installations remain secure and beautiful for decades. Working with qualified tile installers who understand these failure mechanisms guarantees results that withstand time and environmental challenges.
Frequently Asked Questions
How long does thinset need to cure before tiles stop being vulnerable to coming loose?
Thinset typically requires 24-72 hours to achieve sufficient strength for grouting, but full cure takes 28 days. During the first week, avoid heavy loads and moisture exposure. Temperature and humidity conditions affect curing rates - cold or dry environments extend timelines while warm, humid conditions accelerate curing. Always follow the specific manufacturer's recommendations, as modified thinsets may have different requirements than unmodified versions.
Can I reinstall loose subway tiles without removing all surrounding tiles?
Yes, if the substrate remains sound and only a few tiles have failed. Carefully remove loose tiles without damaging adjacent pieces. Clean all old adhesive from both the back of tiles and the wall surface. Apply fresh thinset and reset the tiles, ensuring proper alignment with surrounding pieces. However, if multiple tiles are loose or sound hollow when tapped, the problem likely extends beyond visible failures and requires more extensive repairs.
What causes tiles to come loose years after installation when they seemed fine initially?
Delayed failures typically result from slow moisture infiltration through inadequate waterproofing or deteriorating grout joints. Water gradually dissolves thinset or creates mold that destroys adhesive bonds. Temperature cycling can also cause progressive weakening as materials expand and contract at different rates. Foundation settling that occurs years after construction generates new stresses exceeding the installation's capacity to accommodate movement. Regular maintenance including grout sealing prevents many delayed failures.
Do porcelain subway tiles require different installation methods than ceramic to prevent loosening?
Porcelain tiles are denser and less porous than ceramic, requiring modified thinset with stronger bonding capabilities. Their lower water absorption means they don't help wick moisture from adhesive during curing, so proper thinset consistency becomes even more critical. Porcelain also requires more precise cutting tools and techniques due to its hardness. However, once properly installed with appropriate materials, porcelain provides superior durability and moisture resistance compared to ceramic alternatives.
How can I tell if loose tiles indicate a serious structural problem versus simple installation errors?
Crack patterns reveal the difference - random isolated failures suggest installation problems, while systematic patterns following lines indicate structural issues. Tiles coming loose in vertical lines suggest wall movement, horizontal patterns indicate foundation settling, and diagonal cracks often signal differential settling. If repairs fail repeatedly in the same areas, or if you notice cracks in drywall, sticking doors, or uneven floors elsewhere in the building, consult a structural engineer before retiling.