Choosing the right tile layout can transform a cramped space into an airy retreat. Subway tiles remain a timeless choice for homeowners seeking both style and spatial illusion. The orientation you select-vertical or horizontal-dramatically impacts how large or small your room appears.
Quick Answer: Vertical subway tile installations draw the eye upward, making ceilings feel higher and rooms more expansive. Horizontal layouts create width, ideal for narrow spaces needing visual breadth. Your choice depends on your room's specific proportions and design goals.
Many homeowners struggle with making small bathrooms, kitchens, and laundry rooms feel more spacious. Poor tile orientation can accidentally shrink your space visually. This guide reveals how strategic subway tile placement creates the illusion of larger rooms. You'll discover which direction suits your space, plus expert tips for maximizing every square inch through smart design choices.
Why Subway Tile Orientation Matters for Space Perception
The direction of your tile installation isn't just aesthetic-it's architectural psychology. Our brains interpret directional lines as cues for spatial dimensions. When tiles run vertically, they guide eyes toward the ceiling, creating height perception. Horizontal installations stretch visual width across walls.
Kitchen backsplash designs particularly benefit from thoughtful orientation choices. Behind stoves and sinks, the right direction complements counter lines while influencing overall room feel. Understanding these principles helps you make informed decisions for your renovation project.
Key benefits of strategic tile orientation include:
- Enhanced ceiling height perception through vertical lines
- Widened narrow spaces using horizontal patterns
- Better light reflection based on grout line direction
- Improved visual flow connecting adjacent rooms
- Balanced proportions in awkwardly shaped areas
Professional installers at premium tile suppliers understand these spatial dynamics. They can assess your unique space and recommend orientations that maximize perceived square footage without structural changes.
Vertical vs. Horizontal: A Detailed Comparison
Understanding Vertical Subway Tile Layouts
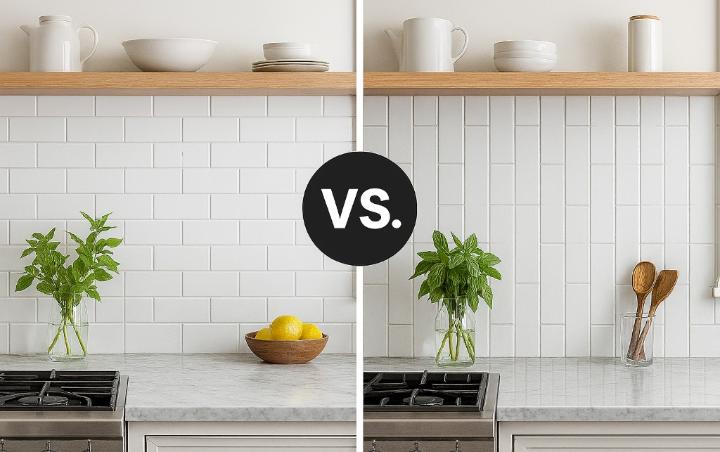
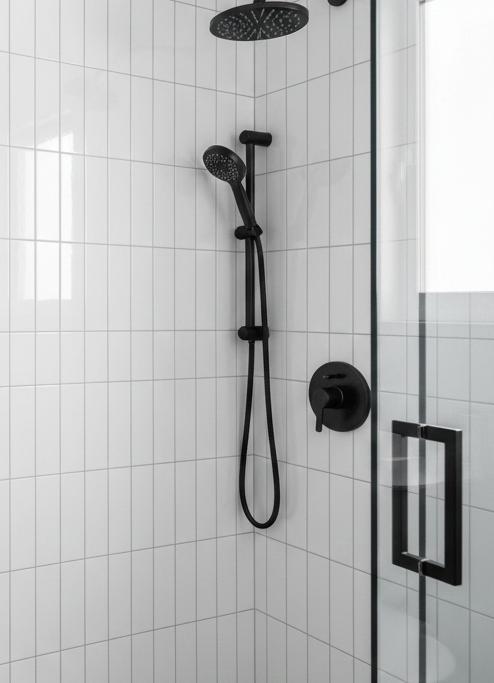
Vertical installations create striking visual impact by defying traditional expectations. White subway tiles arranged vertically make standard 8-foot ceilings appear taller. This orientation particularly benefits powder rooms, shower enclosures, and narrow hallways where height enhancement matters most.
The vertical pattern draws eyes upward continuously. Grout lines form ladder-like guides toward the ceiling. This upward momentum tricks perception into registering more overhead space. Designers often pair vertical tiles with tall mirrors or vertical light fixtures to amplify this effect.
Consider vertical orientation when your space features:
- Low ceilings needing height illusion
- Narrow vertical proportions
- Strong horizontal elements requiring balance
- Modern or contemporary design schemes
Exploring Horizontal Subway Tile Patterns
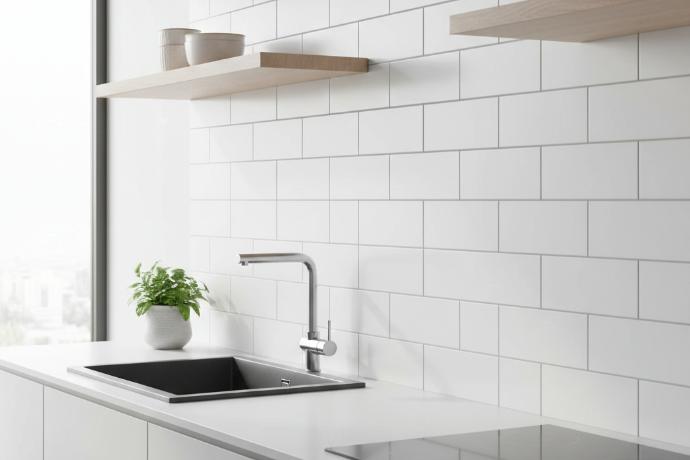
Horizontal layouts honor subway tile's traditional heritage while creating width. Black subway tiles installed horizontally make confined kitchens feel more expansive laterally. This classic orientation complements most architectural styles from farmhouse to transitional designs.
Running bond patterns-where each tile centers over the joint below-enhance horizontal flow. The staggered effect creates gentle visual movement across walls. This calming rhythm works beautifully in spaces where you want relaxation rather than drama.
Horizontal installation excels in:
- Wide rooms with adequate ceiling height
- Spaces requiring traditional character
- Areas with strong vertical elements needing counterbalance
- Rooms where width matters more than height
Quick Comparison Table
Feature | Vertical Orientation | Horizontal Orientation |
Height Perception | Significantly increased | Minimal change |
Width Perception | Unchanged or reduced | Noticeably expanded |
Installation Difficulty | More challenging cuts | Standard, easier process |
Design Style | Contemporary, bold | Classic, versatile |
Best For | Low ceilings, narrow spaces | Wide rooms, traditional homes |
Grout Line Emphasis | Upward visual pull | Lateral visual stretch |
Design Applications Across Color and Material Choices
Light-Colored Options for Maximum Brightness
Grey subway tiles in soft tones work brilliantly in either orientation. Light colors naturally reflect more illumination, making rooms feel airier regardless of direction. Pair pale grey tiles vertically in small bathrooms to achieve both height and brightness simultaneously.
Vertical glossy subway tiles amplify natural light by creating reflective columns. The sheen bounces light upward, further enhancing ceiling height perception. This combination proves especially effective in windowless bathrooms or interior powder rooms lacking natural illumination sources.
Bold Colors and Strategic Placement
Blue subway tiles installed horizontally create soothing, spa-like environments. The color psychology of blue promotes calmness while horizontal lines provide grounding stability. This combination works beautifully in master bathrooms where relaxation takes priority over spatial tricks.
Green subway tiles offer versatility in either direction. Vertical arrangements in sage or mint create fresh, botanical vibes perfect for modern spaces. Horizontal emerald or forest green installations deliver sophisticated drama in well-lit kitchens.
For accent walls, consider these approaches:
- Vertical marble subway tiles behind freestanding tubs
- Horizontal ceramic subway tiles for full-wall kitchen coverage
- Mixed orientations creating geometric feature panels
- Diagonal patterns for artistic statement walls

Material Considerations and Finish Selection
Porcelain subway tiles offer durability in either orientation. Their low water absorption makes them ideal for shower installations where vertical layouts showcase their technical performance. The material's strength supports challenging vertical cuts without compromising longevity.
Matte subway tiles hide water spots better than glossy finishes. In horizontal kitchen applications, matte surfaces near sinks maintain their appearance despite daily splashing. The understated finish also complements various design styles without overwhelming other room elements.
Step-by-Step Guide: Choosing Your Ideal Orientation
Step 1: Measure Your Space Dimensions Document ceiling height and wall length precisely. Rooms under 8 feet tall benefit from vertical patterns. Spaces wider than 10 feet accommodate horizontal layouts comfortably without feeling stretched.
Step 2: Identify Your Primary Concern Determine whether height or width perception matters most. Bathrooms often need height while galley kitchens require width enhancement. Your priority dictates your direction choice immediately.
Step 3: Consider Existing Architectural Elements Examine windows, doors, and built-in features. Vertical tiles complement tall windows beautifully. Horizontal installations harmonize with lengthy countertops and expansive cabinetry runs naturally.
Step 4: Test with Samples Order tile samples and temporarily position them both ways. Live with each arrangement for several days. Notice how natural light interacts with different orientations throughout daylight hours.
Step 5: Consult Professional Resources Connect with experienced installers who understand spatial design principles. Their expertise prevents costly mistakes and ensures your chosen orientation achieves desired results perfectly.
Pros and Cons: Making Your Final Decision
Vertical Installation Advantages and Drawbacks
Pros:
- Creates dramatic height illusion in compact spaces
- Offers contemporary, fashion-forward aesthetic appeal
- Draws attention to architectural ceiling details
- Works exceptionally well in shower enclosures
- Distinguishes your design from standard installations
Cons:
- Requires more precise cutting around fixtures
- May emphasize low ceilings if poorly executed
- Can appear trendy rather than timeless
- Typically costs slightly more in labor
- Limits traditional design compatibility
Horizontal Installation Benefits and Limitations
Pros:
- Delivers classic, enduring visual appeal
- Easier installation reduces labor expenses
- Creates width in narrow galley configurations
- Suits virtually any design style seamlessly
- Maintains better resale value through familiarity
Cons:
- Does nothing to address ceiling height concerns
- Appears conventional rather than innovative
- May emphasize room length excessively
- Offers less visual drama than alternatives
- Risks looking dated in ultra-modern spaces
Expert Solutions from Trusted Tile Specialists
Selecting the perfect orientation becomes simpler with expert guidance and quality materials. Explore extensive collections featuring every subway tile variation imaginable. From 3x6 classic dimensions to unique 3x12 formats, professional-grade options await your project.
Quality suppliers provide comprehensive support beyond product selection. Request samples to evaluate colors, finishes, and sizes in your actual lighting conditions. This hands-on approach eliminates guesswork and ensures satisfaction before committing to full quantities.
Consider these value-added services when choosing suppliers:
- Free design consultations assessing your specific space
- Detailed installation guides for different orientations
- Color-coordinated shopping tools simplifying selection
- Size comparison resources for proportion planning
- Access to trending styles and emerging patterns
Professional tile organizations emphasize working with certified installers for optimal results. Their training ensures proper substrate preparation, waterproofing, and orientation execution. This expertise protects your investment while delivering the spatial effects you're seeking.
Complementary Design Elements That Enhance Space
Beyond orientation, several factors amplify spatial perception. Grout color selection impacts visual continuity significantly. Matching grout to tile color minimizes line visibility, creating seamless surfaces that feel larger. Contrasting grout emphasizes pattern geometry, adding intentional design interest.
Lighting placement works synergistically with tile direction. Vertical installations benefit from up lighting near the ceiling. Horizontal layouts shine under evenly distributed overhead illumination. Layer ambient, task, and accent lighting for maximum dimensional depth.
Mirror positioning dramatically affects spatial perception. Place large mirrors opposite tiled walls to double visual square footage instantly. The reflection multiplies your carefully chosen orientation's effect exponentially. Strategic mirror placement can make even genuinely small rooms feel surprisingly spacious.
Consider complementary materials that reinforce your chosen direction. Vertical tile pairs beautifully with tall cabinetry and full-length windows. Horizontal installations harmonize with lengthy floating vanities and extended counter runs naturally.

Current Industry Trends and Innovation
Modern subway tile applications push traditional boundaries creatively. Terrazzo-look varieties combine classic shapes with contemporary speckled patterns. These versatile options work stunningly in either orientation while adding textural interest beyond standard solid colors.
Three-dimensional decorative options introduce literal depth alongside directional illusion. Raised surface patterns create shadow play that enhances spatial perception regardless of installation angle. These innovative designs appear frequently at industry events like Coverings, showcasing evolving possibilities.
According to tile historians, subway patterns originated from practical transit system needs. Today's residential applications honor that utilitarian heritage while embracing artistic freedom. Mixing orientations within single spaces creates dynamic focal points without sacrificing the illusion benefits each direction provides independently.
Professional organizations like the National Kitchen and Bath Association track design preferences annually. Recent data shows increased interest in vertical installations among younger homeowners seeking distinctive looks. Traditional horizontal layouts remain popular with buyers prioritizing timeless appeal and future resale considerations.
Practical Installation Considerations
Understanding technical requirements prevents disappointment after installation begins. Ceramic versus porcelain differences affect cutting ease and durability differently. Porcelain's density makes vertical cuts more challenging but delivers superior moisture resistance in wet applications.
Wall preparation significantly impacts final appearance regardless of orientation. Perfectly flat surfaces ensure straight grout lines and professional results. Uneven walls become more noticeable with vertical installations where gravity emphasizes imperfections. Proper substrate preparation proves essential before any tile goes up.
Grout joint sizing influences maintenance and appearance. Narrower joints create sleeker, more contemporary looks but require perfectly consistent tile dimensions. Wider joints forgive slight size variations while adding traditional character. Certified installers balance aesthetic preferences with practical longevity considerations.
For exterior applications, orientation affects water drainage patterns. Horizontal outdoor tile installations encourage water runoff away from structures. Vertical patterns may trap moisture in grout lines unless specially treated. Climate and exposure conditions dictate appropriate choices for covered versus exposed locations.
Conclusion
Strategic subway tile orientation transforms ordinary rooms into visually expansive havens. Vertical installations create height illusions perfect for compact spaces with ceiling concerns. Horizontal patterns expand narrow areas through width perception, delivering timeless appeal across design styles.
Your ideal choice depends on specific room proportions, architectural features, and personal aesthetic preferences. Consider ceiling height, wall length, existing elements, and desired atmosphere carefully. Test samples in actual lighting conditions before making final commitments.
Quality materials and expert installation ensure your chosen orientation achieves maximum spatial impact. Browse comprehensive selections spanning every color, finish, and size imaginable. Partner with knowledgeable suppliers offering samples, guidance, and professional installation referrals.
Ready to make your space feel remarkably larger through smart subway tile orientation? Connect with design experts who understand spatial psychology and tile installation excellence. Transform your renovation vision into reality with proven strategies that deliver stunning, spacious results.
Frequently Asked Questions
Does vertical or horizontal subway tile make a room look bigger overall?
Vertical subway tile makes rooms with low ceilings appear taller by drawing eyes upward. Horizontal installations create width in narrow spaces. Choose based on which dimension-height or width-needs enhancement most in your specific room.
What is the most popular subway tile orientation for kitchen backsplashes?
Horizontal orientation remains most popular for kitchen backsplashes due to its classic appearance and ease of installation. It complements counter lines naturally and suits traditional through contemporary design styles effectively.
Are vertical subway tiles harder to install than horizontal?
Yes, vertical installations typically require more precise cutting around outlets, switches, and fixtures. The pattern demands careful planning to maintain visual continuity. Labor costs often run slightly higher for vertical versus horizontal applications.
Can I mix vertical and horizontal subway tile in the same room?
Absolutely. Mixing orientations creates dynamic focal points and zones within spaces. Consider vertical behind a vanity with horizontal on surrounding walls, or create geometric patterns combining both directions for artistic impact.
What grout color works best with subway tile to maximize space?
Matching grout color to your tile creates seamless surfaces that feel larger by minimizing visual interruption. For classic contrast emphasizing pattern, choose grout one or two shades darker than your tile color.