Sealing subway tile grout protects against moisture damage, prevents staining, and extends the lifespan of your tile installation by creating a protective barrier. Most grout types require sealing within 48-72 hours after installation and resealing every 1-2 years depending on usage and location.
Whether you're planning subway tile kitchen ideas or updating a bathroom with herringbone subway tile backsplash, understanding proper grout maintenance ensures your investment stays beautiful for decades. The debate around grout sealing confuses many homeowners.
Without proper sealing, grout lines become magnets for dirt, mold, and discoloration, transforming your pristine installation into a maintenance nightmare. This guide delivers clear answers on timing, frequency, and techniques that keep your subway tile with dark grout looking freshly installed year after year.
Understanding Grout Types and Sealing Requirements
Not all grout requires the same sealing approach. The composition of your grout determines whether sealing becomes mandatory or optional maintenance.
Cement-based grout, the most common type found in residential installations, absorbs moisture like a sponge without proper sealing. This porous material appears in traditional 3x6 subway tiles and contemporary chevron subway tile arrangements.
According to the Ceramic Tile Foundation, unsealed cement grout can absorb up to 30% of its weight in moisture, leading to structural problems and mold growth. Epoxy grout presents a different scenario entirely.
This non-porous alternative contains no cement, relying instead on epoxy resins that naturally resist moisture and staining. Many professional installations now specify epoxy grout for vertical subway tile applications in high-moisture areas.
The material costs more upfront but eliminates ongoing sealing requirements. Urethane grout represents the newest category, combining the stain resistance of epoxy with easier application.
This pre-mixed option works particularly well with colored subway tile installations where consistent color matching matters.
When to Seal Grout After Installation
Timing your initial seal determines long-term grout performance. Rush the process and you trap moisture inside; wait too long and stains set permanently. Fresh grout needs adequate curing time before sealing.
Most cement-based grout requires 48-72 hours of drying time, though this extends to 7-10 days in humid climates. Your basketweave subway tile bathroom might need extra drying time compared to a well-ventilated kitchen backsplash.
Testing readiness involves a simple water drop test: if water beads up and sits on the surface, the grout has dried sufficiently. If it immediately absorbs, wait another 24 hours. Professional installers who specialize in creative backsplash ideas often recommend waiting the full seven days regardless of apparent dryness.
This cautious approach accounts for moisture trapped beneath the tile surface. Premature sealing traps this subsurface moisture, creating the perfect environment for mold growth and efflorescence. Winter installations in unheated spaces might need two weeks of curing time.
The National Kitchen & Bath Association recommends using moisture meters for high-value installations to eliminate guesswork.
Why Grout Sealing Matters for Longevity
Protection against daily wear justifies the sealing investment. Understanding specific benefits helps homeowners prioritize maintenance budgets effectively.
Moisture barrier creation ranks as the primary reason for sealing grout. In shower applications featuring herringbone subway tile backsplash patterns, unsealed grout allows water to reach the substrate, potentially rotting wood backing or dissolving tile adhesive.
Research from the Natural Stone Institute demonstrates that properly sealed grout lasts three times longer than unsealed alternatives in wet environments. Stain prevention extends beyond aesthetic concerns.
Kitchen backsplashes encounter grease splatter, wine spills, and acidic foods that permanently discolor unsealed grout. Sealed grout maintains a smooth, cleanable surface that wipes down effortlessly.
Mold and mildew resistance provides crucial health benefits. Bathrooms naturally generate humidity, creating ideal conditions for fungal growth in porous materials. Sealed grout denies mold the moisture access needed for colonization.
Comparison: Sealed vs. Unsealed Grout Performance
Factor | Sealed Grout | Unsealed Grout |
Moisture Absorption | Less than 5% | Up to 30% |
Stain Resistance | High (wipes clean) | Low (stains penetrate) |
Mold Growth Risk | Minimal | Moderate to High |
Cleaning Time | 5-10 minutes | 30+ minutes with scrubbing |
Lifespan | 10-15 years | 5-7 years |
Maintenance Frequency | Annual resealing | Constant deep cleaning |
How Often Should You Reseal Grout
Resealing schedules vary based on location, use patterns, and product quality. Establishing a personalized timeline prevents premature wear while avoiding unnecessary maintenance.
High-traffic areas demand more frequent attention. Kitchen backsplashes with modern subway tile patterns near cooking surfaces need annual resealing due to heat, grease, and moisture exposure. Shower walls featuring vertical subway tile arrangements benefit from resealing every 12-18 months.
Floor grout in entryways might need resealing every six months. Low-traffic locations extend intervals significantly. Guest bathroom walls with chevron subway tile might go three years between sealing applications.
According to installation standards, grout should be resealed whenever water stops beading on the surface during testing. Premium penetrating sealers cost more but often provide twice the protection duration of budget alternatives. Some advanced formulations now offer five-year protection in moderate-use areas.
Pros and Cons of Different Sealing Frequencies
Annual Sealing:
- Pros: Maximum protection, prevents any stain penetration, easiest to maintain schedule
- Cons: Higher long-term cost, more time investment, potential product buildup
Biennial Sealing:
- Pros: Balanced protection and effort, adequate for most residential uses, lower cost
- Cons: Slight vulnerability window before resealing, requires condition monitoring
As-Needed Sealing:
- Pros: Potentially lowest cost, tailored to actual wear patterns
- Cons: Requires vigilant monitoring, risks missing optimal resealing window

Testing If Your Grout Needs Resealing
Visual inspection and simple tests reveal when grout protection has degraded. These methods work equally well for basketweave subway tile, terrazzo-look applications, or traditional layouts.
The water drop test provides the most reliable assessment. Place several drops of water on different grout lines throughout your installation. Fresh sealer causes water to bead up and roll off the surface. Degraded sealer allows water to slowly absorb into the grout, darkening its color.
If absorption occurs within 5-10 minutes, resealing becomes necessary. Color changes signal compromised protection. Grout that appears darker or develops uneven coloring often indicates moisture penetration.
Light-colored grout shows yellowing or browning when sealer protection fails. Texture assessment reveals subtle degradation. Run your finger across grout lines to check for rough, chalky textures. Properly sealed grout feels smooth and slightly slick. Degraded sealer exposes the rough cement texture underneath.
Step-by-Step Guide to Sealing Grout Properly
Professional results require methodical preparation and application techniques. This process applies whether you're protecting tile selections by color or maintaining existing installations.
Step 1: Deep Clean the Grout Remove all dirt, oils, and residue using a pH-neutral grout cleaner and stiff brush. Rinse thoroughly with clean water and allow 24 hours of drying time. According to ceramic tile guidelines, trapped dirt under sealer creates permanent discoloration.
Step 2: Protect Adjacent Surfaces Apply painter's tape along edges where tile meets countertops, cabinets, or fixtures. While modern sealers claim not to damage tile glazing, overspray or drips can create hazy films on polished surfaces.
Step 3: Apply Sealer Evenly Using a foam brush or specialized applicator bottle, apply sealer directly to grout lines. Work in small sections of 10-15 square feet. For vertical applications like herringbone subway tile backsplash, work from bottom to top to catch any drips. Most penetrating sealers require 5-10 minutes to absorb before wiping away excess product.
Step 4: Second Coat Application After the first coat dries completely (typically 2-4 hours), apply a second coat using the same technique. This double application ensures complete pore saturation and maximum protection duration.
Step 5: Final Cure and Testing Allow 24-48 hours before exposing sealed grout to water or heavy use. Perform a water drop test after the cure period to verify successful sealing.
Choosing the Right Grout Sealer
Product selection impacts both protection effectiveness and application ease. Understanding formulation differences helps match sealers to specific tile applications.
Penetrating sealers work by soaking into grout pores rather than coating the surface. These products allow vapor transmission while blocking liquid penetration, making them ideal for areas needing breathability. They work exceptionally well with colored subway tile installations where maintaining natural grout texture matters.
According to tile layout specialists, penetrating sealers provide the most durable protection for residential applications. Topical sealers create a protective film on grout surfaces. These products offer immediate water resistance and often include color enhancement properties.
However, they require more frequent reapplication and can create slippery surfaces when used on floors. Water-based versus solvent-based formulations present another decision. Water-based sealers produce fewer fumes, making them suitable for occupied spaces and bathroom trends requiring minimal disruption.
Solvent-based alternatives penetrate more aggressively but require extensive ventilation.
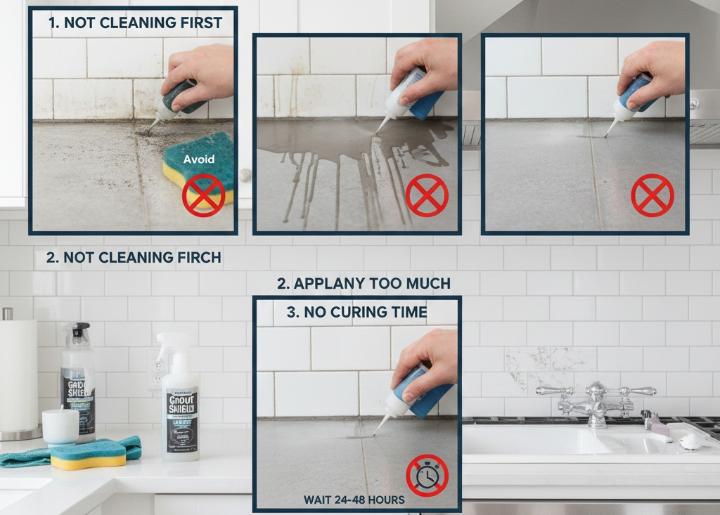
Common Grout Sealing Mistakes to Avoid
Understanding typical errors prevents frustration and ensures effective protection.
Sealing dirty grout tops the list of preventable failures. Any dirt, soap scum, or residue present during sealing becomes permanently trapped under the protective barrier. The grout must be pristine before sealer application.
Over-application causes multiple problems. Excess sealer that sits on tile surfaces creates hazy films requiring aggressive buffing for removal. Quality matters more than quantity; a thin coat of premium sealer outperforms heavy applications of inferior products.
Insufficient drying time between coats or before water exposure compromises protection effectiveness. When working with products by type, always err on the side of longer drying times.
Wrong product selection for specific applications creates disappointing results. The Mohs hardness scale considerations that apply to tile materials also influence sealer compatibility.
Special Considerations for Different Tile Locations
Installation location dramatically influences sealing requirements and techniques.
Shower and tub surrounds face the harshest conditions. Constant water exposure, soap residue, and humidity create perfect conditions for sealer breakdown. These areas benefit from premium penetrating sealers specifically formulated for wet environments.
According to the Ceramic Tile Distributors Association, some professionals recommend resealing shower grout every 12 months regardless of visual condition. Kitchen backsplashes encounter different challenges. Heat from cooking, grease splatter, and acidic food contact demand sealers with superior stain resistance.
If your design incorporates tiles by size variations creating complex grout patterns, ensure complete coverage in hard-to-reach intersections. Floor grout requires specialized consideration. Foot traffic abrades sealer faster than wall applications, necessitating more durable products.
The outdoor tile applications guidance applies equally to indoor floors exposed to moisture. Decorative feature walls using chevron subway tile or basketweave patterns typically see minimal moisture exposure. Lower-stress conditions allow extended sealing intervals, sometimes reaching three years between applications.
Maintaining Sealed Grout Between Applications
Daily and weekly care practices extend sealer effectiveness and postpone reapplication needs.
Immediate spill cleanup prevents staining even on sealed surfaces. While sealer provides protection time, acidic or intensely pigmented substances can penetrate if left for hours. A quick wipe with damp cloth after kitchen activities maintains pristine appearance.
Regular cleaning with appropriate products preserves sealer integrity. pH-neutral cleaners specifically formulated for tile and grout provide effective cleaning without chemical damage. Avoid abrasive scrubbers that mechanically remove sealer.
Proper ventilation reduces moisture accumulation. Running bathroom exhaust fans during and for 30 minutes after showering removes humidity before it saturates grout. Kitchen range hoods activated while cooking prevent grease-laden moisture from settling on backsplash grout.
Professional deep cleaning before resealing optimizes new applications. Scheduling professional service every few years, particularly for complex installations from trusted suppliers, ensures your grout remains in optimal condition.
Professional vs. DIY Sealing: Making the Right Choice
Deciding between professional service and self-application depends on several practical factors.
DIY sealing makes financial sense for straightforward installations. Small backsplashes with simple modern subway tile patterns present manageable weekend projects. The material costs remain modest, typically under $50 for products covering 100-200 square feet of grout.
Professional services justify their cost in complex scenarios. Large shower installations, intricate patterns, or situations involving expensive natural stone tiles often benefit from expert handling. Professionals bring specialized equipment that ensures even coverage in textured grout lines.
Hybrid approaches offer practical middle ground. Hiring professionals for initial sealing after installation ensures proper protection from day one, while homeowners handle routine maintenance resealing as needed.
Consider your specific tile investment when deciding. High-end installations from specialty product catalogs deserve professional attention that maximizes longevity.
Conclusion
Sealing subway tile grout transforms maintenance from constant struggle into manageable routine. Understanding when to apply initial sealer, why protection matters, and how often to reseal empowers homeowners to preserve their tile investments effectively.
Whether your project features herringbone subway tile backsplash, vertical subway tile showers, or creative backsplash ideas with colored subway tile, proper sealing ensures lasting beauty and functionality. The key lies in matching sealing strategies to your specific installation and usage patterns.
High-moisture areas demand vigilant maintenance, while decorative features tolerate extended intervals. Testing grout condition regularly prevents damage while avoiding unnecessary work. Ready to start your next tile project with confidence Explore our extensive selection of subway tiles perfect for any design vision.
Our local showroom staff can guide you through product choices and maintenance best practices. Contact our team to discuss your specific project needs and discover how proper material selection creates spaces that stay beautiful for generations. Visit our website to learn more about quality tile solutions.
Frequently Asked Questions
Can I seal grout immediately after installation?
No, cement-based grout requires 48-72 hours of curing time before sealing, and up to seven days in humid conditions. Sealing too early traps moisture inside, causing mold growth and efflorescence. Always perform a water absorption test to verify readiness before applying sealer. Epoxy and urethane grouts follow different timelines specified by manufacturers.
Does epoxy grout need sealing at all?
Epoxy grout is naturally non-porous and doesn't require sealing for moisture or stain protection. However, some homeowners apply light sealing in heavy-use areas to ease cleaning and maintain consistent appearance. The decision depends on aesthetic preferences rather than structural necessity, unlike cement-based grout that demands sealing for longevity.
How do I know which sealer to use for my grout?
Choose penetrating sealers for most residential applications, as they maintain natural grout texture while providing excellent protection. Select water-based formulations for low odor and easy application, or solvent-based products for maximum penetration in high-porosity grout. Match sealer specifications to your installation location: wet areas need moisture-specific formulations, while floors require abrasion-resistant products.
Can I change grout color when sealing?
Standard sealers don't change grout color, though some contain enhancers that slightly darken appearance. For dramatic color changes, use specialized grout colorant products applied before sealing. These staining products penetrate grout and provide permanent color modification, though they work best on light-colored grout. Always test colorants on hidden areas before full application.
What happens if I never seal my grout?
Unsealed cement-based grout absorbs moisture, stains, and oils, becoming permanently discolored and damaged over time. In wet areas, water penetration can compromise tile adhesive and substrate, leading to loose tiles and expensive repairs. Mold and mildew colonize porous unsealed grout, creating health concerns. While unsealed grout won't fail immediately, its lifespan typically decreases by 50% compared to properly maintained sealed grout.