Calculating subway tile quantities requires measuring your surface area in square feet, adding 10-15% for waste and cuts, then dividing by the coverage per box to determine how many boxes to purchase. Most subway tiles come in boxes covering 5.5 to 7 square feet, with coverage varying based on tile size and layout pattern. Accurate measurements prevent project delays from ordering too little material while avoiding unnecessary expenses from over-purchasing tiles that can't be returned once opened.
The calculation process changes depending on whether you're installing subway tile layouts in straight running bond, modern subway tile patterns like herringbone subway tile backsplash arrangements, or vertical subway tile configurations. Pattern complexity directly affects waste percentage, with diagonal and chevron subway tile installations requiring 15-20% extra material compared to horizontal patterns that need only 10% overage. Taking time to measure precisely and account for pattern waste ensures you purchase enough colored subway tile or subway tile with dark grout to complete your subway tile kitchen ideas or subway tile bathroom trends without mid-project material shortages.
This guide breaks down measurement techniques, waste calculations for different patterns, and ordering strategies that ensure you get the right quantity from professional tile retailers while protecting your budget and timeline.
Measuring Your Surface Area Accurately
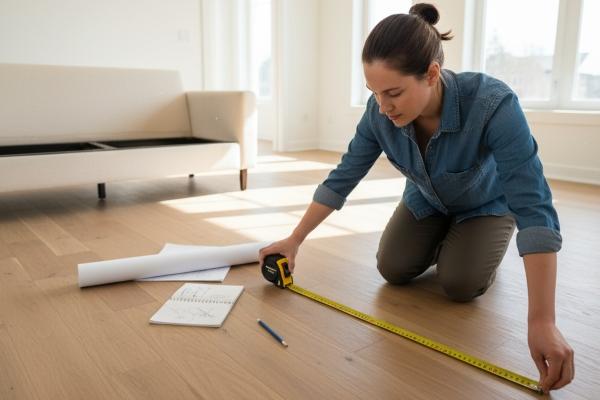
Start by measuring the width and height of each wall section where you'll install subway tiles. Multiply width by height to calculate square footage for each area, then add all sections together for total coverage. Use a laser measuring tool or metal tape measure rather than cloth tapes that stretch. Measure in inches first, then convert to feet by dividing by 12 to ensure precision.
For kitchen backsplashes, measure from countertop to bottom of upper cabinets, typically 18-20 inches. Record measurements for each wall section separately since kitchens have multiple segments interrupted by windows, ranges, or refrigerator spaces. In bathrooms, measure shower walls individually rather than estimating curved corners. Document alcoves, window returns, and wall features that require tiling separately to avoid calculation errors.
Record all measurements on graph paper or a digital app, creating a scale drawing that shows each wall section. Label each measurement with its location when planning layouts by size requirements. Professional installers always measure twice and record everything before ordering materials.
Subtracting Openings From Total Coverage
Windows, doors, outlets, and other openings reduce the tile area you need to cover. Measure each opening's width and height, multiply to get square footage, then subtract from your total wall area. For windows, measure the entire opening including trim if you're tiling around it. Electrical outlets and switches require precise measurements since building codes prohibit covering these features with tile.
Kitchen range hoods typically occupy 30-36 inches of backsplash width, significantly reducing tile requirements for that wall section. Behind ranges and cooktops, check whether your design calls for tile installation or if appliances sit flush against the wall, eliminating coverage needs in those spots. Professional installers often reference proven tile layout strategies when working around these architectural features to ensure proper planning and minimal waste.
Small openings under 1 square foot can be included in your waste calculation rather than subtracted individually. However, major openings exceeding 10 square feet must be subtracted to avoid ordering too much material. If you're planning a bathroom renovation with new fixtures, factor in towel bar locations, toilet paper holders, and grab bar positions that interrupt tile coverage. According to industry guidelines from ANSI, precise measurements prevent material waste while ensuring installations meet safety standards.
Accounting for Pattern Waste Percentages
Straight running bond subway tile installations require 10% overage for normal cutting waste and occasional damaged pieces. Multiply your total square footage by 1.10 to get the actual amount needed. For a 50 square foot backsplash, calculate 50 × 1.10 = 55 square feet of tile needed.
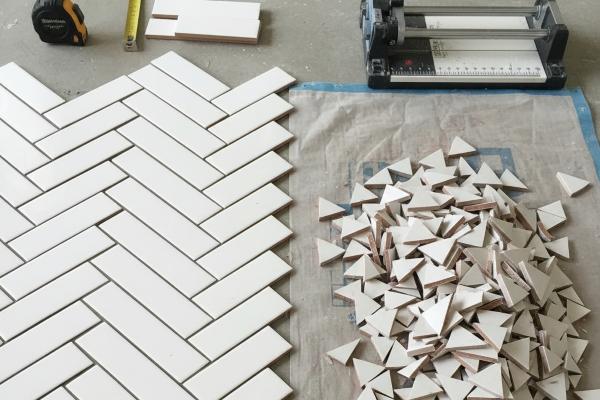
Herringbone subway tile backsplash patterns generate significantly more waste because every tile requires precise 45-degree angle cuts. Add 15-20% extra material for herringbone layouts, multiplying by 1.15 or 1.20 depending on installer skill. Vertical subway tile arrangements also need additional overage since vertical installations create more cuts around ceiling lines and cabinet edges. Chevron subway tile patterns rank among the most wasteful layouts, sometimes requiring 20-25% extra material for complex angle cuts.
Basketweave subway tile layouts generate moderate waste around 12-15%. Creative backsplash ideas incorporating multiple patterns or decorative borders need calculations for each section individually. When mixing colored subway tile in gradient or random patterns, order an extra 5% beyond normal waste calculations to ensure color consistency across production batches. The choice between ceramic and porcelain tile can also affect your waste calculations, as porcelain's harder composition makes it slightly more prone to chipping during cuts. Installing subway tile with dark grout makes even tiny chips more visible, justifying an extra 2-3% overage for selectivity during installation.
Professional installers factor pattern complexity into material orders because running short mid-project creates visible seam lines where new tile batches begin Modern subway tile patterns from reputable suppliers typically maintain better shade consistency, but even slight color variations become obvious when you're forced to order additional boxes from different production runs.
Converting Square Footage to Box Quantities
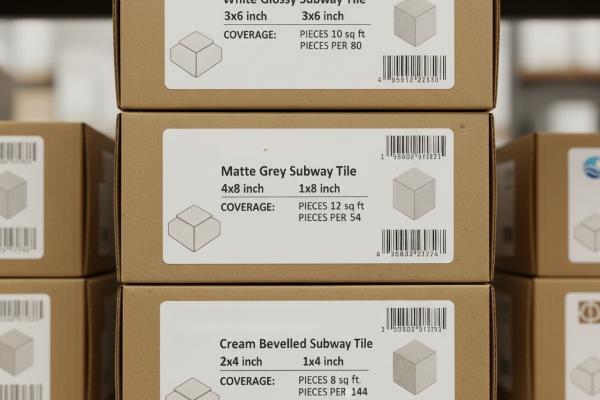
Subway tile boxes display coverage in square feet on labels, typically ranging from 5.5 to 7 square feet per box depending on tile size and packaging. Divide your total needed square footage (including waste percentage) by the coverage per box to determine how many boxes to purchase. Always round up to the next full box. For example, if you need 55 square feet and boxes cover 6 square feet each, divide 55 ÷ 6 = 9.17, meaning you'd order 10 boxes.
Standard 3x6 inch subway tiles usually come 40-48 pieces per box, covering approximately 6 square feet. Larger 4x12 inch subway tiles might have only 15-20 pieces per box but still cover similar square footage. Ceramic subway tiles an porcelain subway tiles from the same size category typically share similar box coverage, though porcelain's denser composition might result in fewer pieces per box due to weight restrictions.
When calculating for multiple rooms, order all material from the same production batch to ensure color and shade consistency. Even identical tile styles can show subtle variations between manufacturing runs. Many stock subway tiles allow individual piece purchases for small repairs, though specialty tiles require full box orders.
Comparing Subway Tiles Coverage by Size
Tile Size | Pieces Per Box | Coverage Per Box | Typical Waste % |
3x6 inch | 40-48 | 5.5-6 SF | 10% |
4x12 inch | 15-20 | 6-7 SF | 10% |
2x8 inch | 48-56 | 5.5-6 SF | 12% |
3x12 inch | 20-24 | 6-7 SF | 10% |
This comparison shows how tile dimensions affect box quantities even when coverage per box remains similar. Larger format tiles require fewer boxes but generate larger waste pieces that can't be reused as easily. The 2x8 inch format creates more waste around corners due to its narrow profile, justifying the higher 12% waste allowance.
When shopping tiles by color, remember that darker colors show chips more readily than lighter shades, justifying an additional 2-3% beyond standard waste calculations.
Step-by-Step Calculation Process
Step 1: Measure Every Surface Calculate square footage for each wall. For a kitchen with walls measuring 8, 6, and 4 feet wide at 20 inches (1.67 feet) high: (8 × 1.67) + (6 × 1.67) + (4 × 1.67) = 30.06 square feet.
Step 2: Subtract Openings Measure windows, outlets, and appliance spaces. For a 30-inch (2.5 feet) range hood at 20 inches high, subtract 2.5 × 1.67 = 4.18 SF: 30.06 - 4.18 = 25.88 SF needed.
Step 3: Add Waste Percentage Multiply by your pattern's waste factor. Running bond (10%): 25.88 × 1.10 = 28.47 SF. Herringbone (15%): 25.88 × 1.15 = 29.76 SF.
Step 4: Divide by Box Coverage If boxes cover 6 SF each: 28.47 ÷ 6 = 4.75, round up to 5 boxes.
Step 5: Order Extra Purchase one additional box for future repairs. Discontinued styles make matching impossible later, saving hundreds in future expenses.
Factors That Increase Material Requirements
Complex layouts with multiple sizes or decorative borders need separate calculations. Decorative elements often need 20-30% extra material. 3D decorative subway tiles generate additional waste due to raised surfaces that make cutting difficult.
Diagonal installations require 15-20% waste because every perimeter tile needs angled cuts. Curved walls typically require 25-30% overage. According to NKBA guidelines, curved installations should be measured by professionals.
Ordering Strategies for Budget Protection
Purchase all material from a single production lot by checking batch numbers on labels. Color variations between production runs become glaringly obvious when installed adjacent to each other. Reputable tile showrooms check batch numbers before shipping.
Many retailers offer return policies for unopened boxes. Check return terms before purchasing since specialty tiles or custom colors often prohibit returns. Standard colors typically allow returns within 30-90 days. Consider future repair needs. One extra box stored properly provides decades of repair material. Popular subway tile styles typically remain available for years, while trendy colors might disappear within months.
Specialty Installation Considerations
Outdoor applications need porcelain rated for outdoor use. Shower installations require attention to waterproofing and drainage slope. Professional installation resources provide guidance for complex wet areas.
Commercial projects benefit from professional estimating services that man specialized contractors provide free with material purchases.
When Professional Estimates Save Money
Complex projects justify professional estimates. Estimators measure accurately based on decades of experience at no cost when you purchase materials from that supplier.
Projects exceeding 500 square feet should receive professional measurement. According to ANSI installation standards, professional measurement ensures compliance with best practices.
Avoiding Common Calculation Mistakes
The most frequent error involves forgetting to add waste percentage before dividing by box coverage. This guarantees material shortages and batch matching problems.
Another common problem stems from measuring in mixed units. Always convert measurements to the same unit before calculating. Vertical subway tile patterns generate more waste than horizontal arrangements, yet many calculators only provide horizontal waste factors.
Overlooking future repair needs leads to regret when you can't match discontinued tiles later. Consider one additional box as an investment in property value.
Budget-Conscious Approaches Without Compromising Results
Purchase materials during sales when suppliers clear inventory. Many established showrooms offer discounts on overstocked items.
Mix decorative elements with affordable field tiles. Feature walls create impact without covering every surface. Compare cost per square foot by dividing box price by coverage.
Ask about contractor pricing. Many retailers offer 10-20% discounts for upfront purchases. Local showrooms provide loyalty rewards for additional savings.
Get Your Calculations Right the First Time
Accurate subway tile quantity calculations prevent expensive mistakes that delay projects. Taking time to measure precisely, account for pattern waste, and order from single production batches ensures sufficient matching material for complete installations. Professional assistance is available from experienced showroom staff who provide measurement verification at no cost when you purchase through their locations.
Visit Nova Tile and Stone's showrooms in Reno, Sparks, Carson City, and Sacramento for expert help calculating material needs. Our team measures job sites, accounts for pattern complexity, and orders materials from matching production lots to guarantee installation success. We'll help you select appropriate tile types and styles while ensuring you purchase the right quantity, protecting your budget and timeline while delivering professional results.
Frequently Asked Questions
How much extra subway tile should I order for waste?
Standard horizontal patterns need 10% extra, while diagonal, herringbone, or chevron patterns require 15-20% overage for cutting waste. Always order at least one additional box beyond calculated needs for future repairs, since discontinued tile styles become impossible to match later. Complex installations with multiple patterns or decorative elements benefit from 20-25% extra material to account for selective piece placement and increased breakage during intricate cutting.
Can I return unopened boxes of subway tile?
Most major retailers accept returns of unopened tile boxes within 30-90 days with original receipts, though policies vary by supplier and product type. Specialty tiles, custom colors, and closeout items often prohibit returns regardless of condition. Verify return terms before purchasing, and always inspect boxes immediately upon delivery to identify shipping damage while return eligibility remains unquestioned.
Do I need to order all my subway tile at once?
Yes, ordering entire project quantities from a single purchase ensures all boxes come from the same production batch, preventing color variation between manufacturing runs. Even identical tile styles show subtle shade differences between batches that become glaringly obvious when installed adjacent to each other. Purchasing all material simultaneously protects against discontinued products and unavailable colors that complicate expansions or repairs requiring additional material months or years later.
How do I calculate subway tile for a diagonal pattern?
Measure surface area normally, then multiply by 1.20 (adding 20% waste) rather than the standard 1.10 for horizontal layouts. Diagonal patterns generate significantly more waste because every perimeter tile requires angled cuts on both ends. The 45-degree orientation creates numerous custom cuts around outlets, corners, and edges that horizontal patterns avoid, justifying higher waste percentages to prevent material shortages during installation.
What's the difference between tile coverage and box quantity?
Tile coverage refers to the square footage one box will install, typically 5.5-7 square feet for subway tiles. Box quantity indicates how many boxes you need to purchase based on your total square footage divided by per-box coverage. Always round up to the next full box since partial boxes aren't sold separately. Remember that advertised coverage assumes minimal waste, so calculate coverage after adding waste percentage to get accurate box quantities.