Subway tile height depends on the room and application. In kitchens, backsplashes typically extend 15-18 inches from countertop to cabinet base, though ceiling-height installations create dramatic modern statements. For bathrooms, shower walls require floor-to-ceiling coverage for complete moisture protection, while vanity areas work well at mid-wall height (36-48 inches) or full height depending on your design preference.
The optimal subway tile endpoint balances three critical factors: moisture protection, visual aesthetics, and budget constraints. Standard applications include backsplash-only coverage in kitchens (most cost-effective), half-wall wainscoting style (traditional elegance), and full-wall installations (contemporary impact). Your ceiling height, architectural features, and room function directly influence which approach delivers the best results.
This comprehensive guide explores essential design fundamentals and actionable strategies to help you accomplish a refined, unified finish that enhances your environment. From synchronizing with architectural elements to managing practical aspects like moisture defense and upkeep, strategic placement delivers transformative results. Whether you're planning a kitchen backsplash, bathroom renovation, or utility space upgrade, understanding proper tile height ensures professional-quality results that protect your walls while elevating your home's aesthetic appeal.

Align Your Subway Tiles with Architectural Elements
Room architecture typically offers inherent termination points for subway tiles. Identifying and coordinating with these characteristics guarantees a fluid, balanced appearance that projects intentionality and expert integration.
Work with Existing Structural Features for Seamless Integration
Subway tiles integrate elegantly with architectural components through thoughtful positioning. Natural interruptions, windowsills, doorframes, or corners, serve as sensible termination points and prevent disjointed transitions. Installing tiles adjacent to alcoves, integrated shelving, or ceiling beams produces a visually anchored result, making tiles appear intrinsic to structural design.
Leverage Ceiling Height to Control Visual Flow
Ceiling elevation substantially affects how expansive or intimate a tiled area appears. In spaces with elevated ceilings, carrying subway tiles to full height emphasizes vertical dimensions, generating a contemporary, spacious ambiance. Alternatively, terminating subway tiles mid-wall introduces warmth and intimacy, proving optimal for bathrooms or compact spaces. For angled or vaulted ceilings, you can trace the slope to establish a dynamic, architectural statement, or maintain consistent height for a conventional, symmetrical aesthetic.
Navigate Open-Concept Spaces with Strategic Planning
Within open-concept environments, establishing subway tile endpoints proves challenging without distinct, organic dividers. Nevertheless, strategic design indicators guide these selections. Synchronizing tile conclusions with notable features like kitchen islands, furniture placement, or ceiling beams establishes subtle visual demarcations while maintaining the expansive, unencumbered character of the space. Through deliberate incorporation of these components, subway tiles amplify the room's organic circulation, producing a harmonious appearance that effortlessly unifies distinct zones.
 Design Strategic Endpoints That Enhance Visual Appeal
Your approach to terminating subway tiles dramatically influences overall spatial aesthetics and atmosphere. The endpoint transcends mere finishing details, it establishes the space's character and movement. Whether you want subway tiles to command attention as striking features or integrate smoothly with surrounding design, their termination point proves instrumental.
Add Professional Borders and Trim for Polished Results
To guarantee your subway tiles achieve a sophisticated, unified completion, integrating borders or trim components like bullnose tiles or metal edging generates substantial impact. These refined details prevent tiles from appearing abruptly terminated and establish a pristine, professional appearance that projects deliberate, thoughtful design. Beyond practical functionality, borders and trims function as compelling design features, introducing contrast, texture, or color accents to enhance overall spatial aesthetics.
For instance, our bullnose trim options in various glossy finishes create refined, vibrant edges that beautifully frame subway tiles while delivering smooth transitions to neighboring surfaces. The lustrous finish contributes depth and boldness, making subway tile installations stand out without dominating the environment. Conversely, selecting neutral trim generates a seamless, subtle appearance that harmonizes naturally with adjacent materials.
Install Half-Wall Applications for Traditional Elegance
For conventional aesthetics, consider terminating subway tiles at mid-wall height, resembling traditional wainscoting. This method introduces texture and dimension while providing flexibility to incorporate complementary paint or wallpaper above the tiled segment. The juxtaposition between smooth tile and alternative wall finishes generates visual intrigue without overwhelming the environment. This approach performs exceptionally in bathrooms, powder rooms, and hallways, where it establishes equilibrium between sophistication and functionality. By shielding lower walls from scuffs, moisture, and daily wear, half-wall tiling merges enduring design with practical advantages, making it an adaptable selection for diverse spaces.
Maximize Impact with Floor-to-Ceiling Installations
Installing tiles across entire walls produces a streamlined, contemporary aesthetic perfectly suited for minimalist environments. This strategy adds visual elevation while establishing continuity, allowing rooms to project openness and unity. It proves particularly effective in kitchens and bathrooms, where clean geometry and uniform surfaces contribute to a refined, sophisticated appearance. Additionally, full-wall subway tile installations reflect illumination, brightening spaces and amplifying openness, especially when combined with glossy finishes that magnify this effect. The fusion of style and functionality makes full-wall tiling a favored selection in modern interior design.

Customize Tile Placement Based on Room Function
Each room serves distinct functions, and your tiling approach should acknowledge these specialized requirements. Factors like moisture exposure, available wall dimensions, and comprehensive design style influence how and where subway tiles terminate. By customizing your tiling strategy to correspond with each space's function and configuration, you establish optimal equilibrium between practicality and visual appeal.
Protect Bathroom Surfaces with Strategic Tile Coverage
In bathrooms, subway tiles deliver both functional advantages and aesthetic enhancement, supplying moisture defense while elevating overall spatial style. In shower zones, installing tiles from floor to ceiling guarantees complete water resistance and produces a sleek, cohesive appearance. For example, incorporating our Lucida 3x9 Glossy Ceramic Tile can transform walk-in showers. The rich, saturated ceramic finish introduces depth and establishes a tranquil, spa-inspired atmosphere, while the glossy surface reflects illumination, making compact showers appear brighter and more expansive.
Beyond shower areas, installing tiles to mid-wall height brings timeless, traditional appeal and coordinates beautifully with complementary paint or wallpaper above. In bathrooms with neutral walls, our vibrant ceramic tiles generate bold contrast, introducing contemporary sophistication while protecting lower sections from water exposure. For enhanced cohesion and dramatic impact, extending these tiles to ceiling height around vanity areas unifies the design, giving spaces a deliberately curated character.
Since bathrooms experience constant moisture, professional installation remains essential to guarantee proper waterproofing and longevity. This maintains subway tiles' appearance over time and prevents complications like mold and grout degradation, preserving both beauty and functionality.
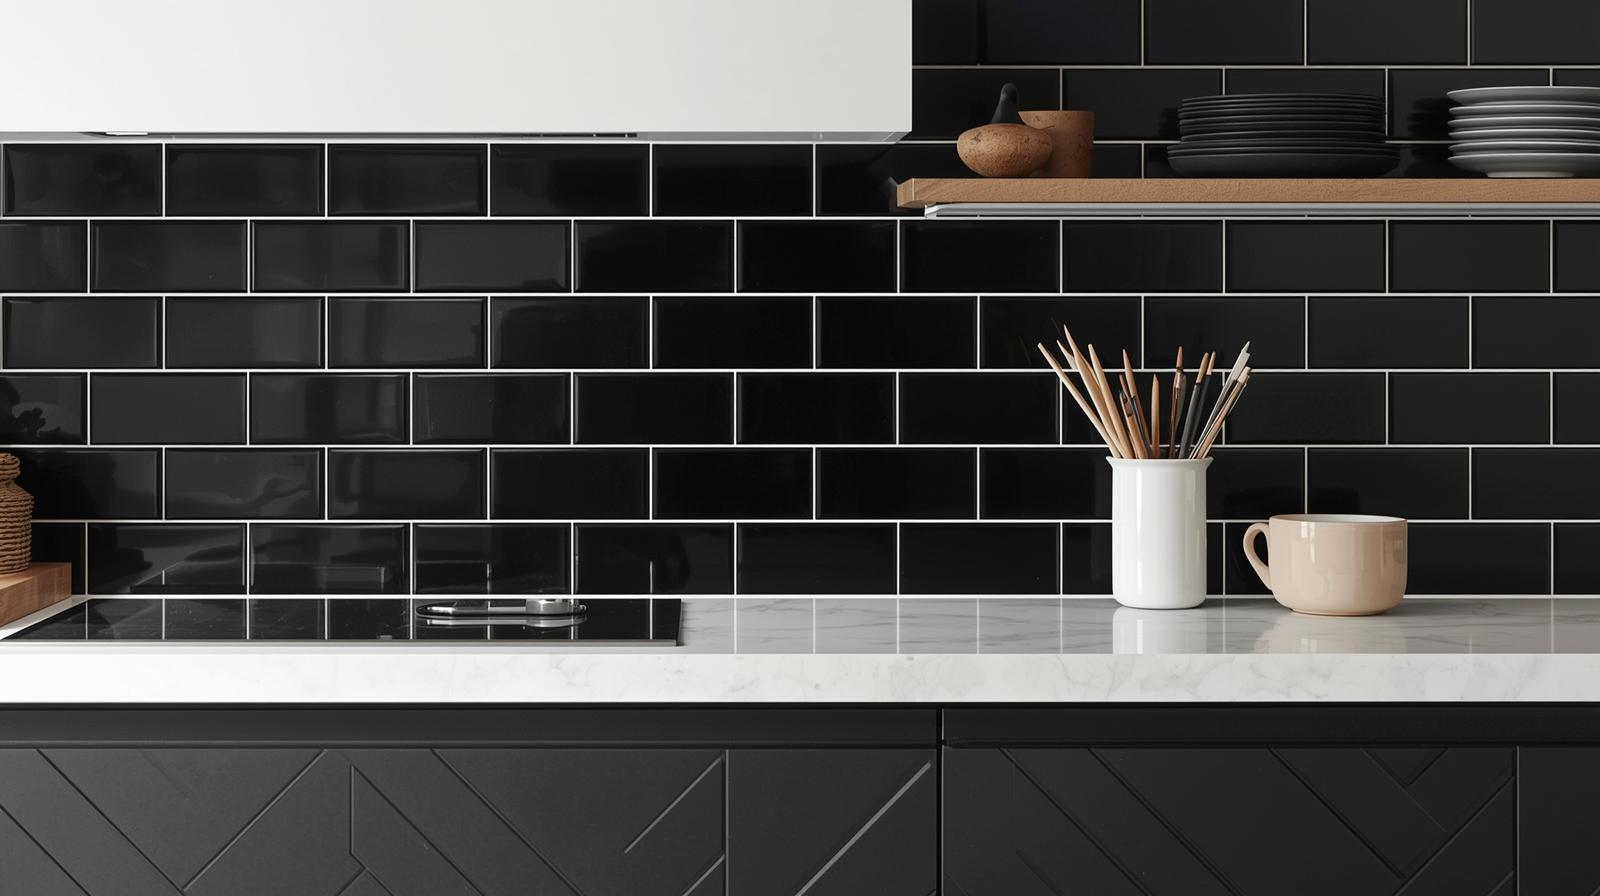
Optimize Kitchen Backsplashes for Style and Function
Extending subway tiles to ceiling height significantly enhances kitchen aesthetics, generating a streamlined, continuous appearance that projects modern refinement. This approach proves especially effective in kitchens with open shelving, where uninterrupted tile backgrounds direct attention upward, emphasizing vertical space and creating an expansive, airy sensation. This effect proves equally striking around feature windows above sinks, as tiles frame natural illumination, brightening spaces and contributing crisp, clean finishes.
To further enhance design, pairing glossy white subway tiles with dark grout introduces contemporary distinction. This contrast contributes depth and definition, delivering bold visual statements without overwhelming environments. This thoughtful pairing increases visual interest and harmonizes with additional key kitchen components, including countertops, cabinetry, and hardware. The outcome becomes a cohesive, polished design that seamlessly integrates the entire space, balancing modern sophistication with timeless appeal.
Transform Utility Spaces into Design Features
Laundry rooms and powder rooms present perfect opportunities for creative expression with bold or distinctive subway tile selections, bringing style to traditionally utilitarian spaces. In laundry areas, tiling walls behind washers, dryers, or utility sinks not only defends against moisture and detergent exposure but elevates overall room design. For instance, utilizing our Montera 2.5x9 Glossy Porcelain Tile in soft, contemporary tones behind sinks and along rear walls introduces gentle color accents that complement neutral cabinetry and metallic fixtures. The glossy porcelain reflects natural and artificial illumination, brightening spaces while the elongated dimensions add modern, elegant variations to traditional subway tile arrangements.
In powder rooms, where compact spaces benefit from bold design declarations, these subway tiles create attention-capturing accent walls behind sinks or toilets. The refined coloration adds personality without overwhelming rooms, while glossy finishes bring sophistication and dimension. Coordinated with matte black fixtures or warm wooden accents, subway tiles establish balanced aesthetics that project freshness yet timelessness. These deliberate design selections enhance smaller space aesthetics and provide durability with easy maintenance, making them both beautiful and practical home additions.

Balance Visual Design with Practical Requirements
While subway tiles constitute beautiful design components, overlooking practical functions, especially in moisture-exposed, grease-prone, or high-traffic areas proves detrimental. Proper positioning enhances both appearance and functionality.
Shield High-Traffic Areas from Daily Wear
Tiles function as barriers in locations susceptible to spills, splashes, and stains. In kitchens, subway tiles typically extend from countertops to lower cabinet edges, defending walls from cooking splatter. In bathrooms, subway tiles surrounding sinks, bathtubs, and vanities prevent water damage while contributing style. Extending tiles slightly beyond heavily-used zones offers additional protection and more refined finishes.
Plan for Future Renovations and Layout Changes
When planning tile arrangements, consider not merely current appearance, but future evolution. If anticipating renovations, appliance upgrades, or furniture rearrangements, selecting flexible endpoints for subway tiles helps avoid unnecessary labor and expenses later. For example, terminating tiles at heights accommodating potential cabinetry modifications allows changes without retiling complications. This thoughtful approach guarantees design versatility and continued spatial complementation through transformations.
Simplify Upkeep with Smart Material Selection
Subway tile positioning significantly impacts cleaning ease and maintenance, affecting both functionality and design durability. Areas experiencing frequent use behind stoves, sinks, or laundry appliances, benefit from tiled surfaces resisting splashes and simplifying cleaning, managing everyday messes efficiently. To simplify upkeep further, selecting darker grout or stain-resistant materials reduces dirt and grime visibility, keeping spaces looking fresh with minimal effort.
Beyond material selection, proper installation proves essential for maintaining subway tile durability and visual appeal over time. Hiring professional installers guarantees precise, polished finishes while reducing future complications like cracking or water damage. To further protect your investment, following manufacturer care recommendations maintains tile appearance and performance, keeping spaces beautiful and easy to maintain for years.
Maximize Your Budget with Strategic Design Decisions
Budget considerations significantly influence where subway tiles terminate, affecting both project scope and style. However, limited budgets don't necessitate aesthetic compromises. With strategic planning and deliberate selections, achieving beautiful, premium appearances without overspending proves entirely feasible. By concentrating on key areas, selecting cost-effective materials, and minimizing waste, you can establish polished, cohesive designs that project style while remaining budget-conscious.
Focus Tile Installation on High-Impact Zones
Maximizing budgets begins with concentrating on high-impact areas where subway tiles generate maximum visual impact. In kitchens, this typically means restricting tiling to backsplash areas, which defend walls while adding stylish focal points behind stoves or sinks. This targeted methodology enhances overall design without added costs from full-wall tiling.
Similarly, in bathrooms, establishing single accent walls perhaps behind vanities or within showers, adds depth and character without requiring extensive tile coverage. This conserves materials and labor while directing attention to key spatial features. By thoughtfully selecting tile placement, you accomplish polished, cohesive aesthetics that project intentionality and premium quality while maintaining budgets.
Minimize Material Waste Through Precise Planning
Strategic planning plays crucial roles in minimizing waste and maintaining project budgets. Begin by measuring spaces accurately and selecting tile dimensions aligning with wall or floor measurements. Choosing our standard subway tile sizes, like the Perfection 2.5x8 or Montera 2.5x9 and straightforward layouts, like traditional brick patterns, significantly reduces required cuts, decreasing material waste and labor expenses.
Additionally, planning layouts to avoid excessive cuts around windows, outlets, or corners conserves tiles and contributes to cleaner, more professional finishes. For example, aligning subway tiles with cabinet or countertop edges generates seamless transitions and reduces custom cut requirements. By approaching tile layouts with precision and efficiency, you accomplish refined appearances while maximizing materials and budgets.
Combine Materials for Cost-Effective Visual Interest
Combining subway tiles with alternative materials, including wood panels, wallpaper, or paint, effectively creates dynamic, visually compelling spaces while controlling costs. Mixing textures and finishes introduces depth and provides enhanced design flexibility. For example, tiled backsplashes paired with wooden open shelving bring warmth and character to kitchens, balancing modern and rustic aesthetics. This approach elevates overall appearance without added expenses from complete wall tiling, making it both stylish and budget-friendly. Through thoughtful material blending, you establish spaces that project natural cohesion. According to industry research, the ceramic tile market continues to grow as homeowners seek durable, versatile design solutions.
Conclusion
Determining the ideal height for subway tile installation requires careful consideration of architectural features, room functionality, and design preferences. Whether you choose to extend tiles to ceiling height for a dramatic, contemporary effect or terminate them at mid-wall for traditional elegance, each approach offers distinct advantages that can transform your space. The key lies in balancing aesthetic appeal with practical requirements, protecting high-moisture areas, accommodating future renovations, and maintaining budget considerations.
At Nova Tile and Stone, we understand that successful tile installation extends beyond selecting beautiful materials. It involves strategic planning, precise execution, and expert guidance throughout the process. Our comprehensive selection of quality tile options, including the Lucida 3x9 Glossy Ceramic Tile, Montera 2.5x9 Glossy Porcelain Tile, and Perfection 2.5x8 options, provides versatile solutions for every design vision and functional requirement.
Take the guesswork out of your project by leveraging our free design consultation service and $1 sample program. Our experienced team across Northern Nevada and Northern California locations stands ready to help you visualize, plan, and execute subway tile installations that enhance your space's beauty and functionality for years to come. Start your design journey today and discover how strategic tile placement can elevate your kitchen, bathroom, or any space in your home.
Frequently Asked Questions
What is the standard height for a kitchen backsplash with subway tile?
The standard kitchen backsplash height typically ranges from 15 to 18 inches, extending from the countertop to the bottom edge of upper cabinets. However, this measurement isn't universal, it depends on your cabinet configuration and design preferences. For kitchens with open shelving or no upper cabinets, extending subway tiles higher or even to the ceiling creates a dramatic, cohesive appearance. When working with our Perfection 2.5x8 or Montera 2.5x9 subway tiles, we recommend measuring your specific space and consulting with our design team to determine the optimal height that balances functionality with visual appeal. Remember to account for outlets, switches, and any architectural features that might influence your tile endpoint.
Should subway tile go all the way to the ceiling in a shower?
Yes, extending subway tiles from floor to ceiling in shower areas is highly recommended for both practical and aesthetic reasons. Complete tile coverage provides comprehensive moisture protection, preventing water damage to walls and eliminating potential mold growth behind partially tiled surfaces. This approach also creates a sleek, unified appearance that makes even compact showers feel more spacious. Our Lucida 3x9 Glossy Ceramic Tile works exceptionally well for floor-to-ceiling shower installations, as the glossy finish reflects light and the ceramic construction offers excellent water resistance. Professional installation ensures proper waterproofing membranes and grout sealing, which are essential for long-term durability in high-moisture environments.
How high should subway tile go behind a bathroom vanity?
Behind bathroom vanities, subway tile height depends on your design goals and practical needs. The minimum recommended height is 4 inches above the countertop to protect walls from water splashes, but extending tiles higher creates more visual impact. Popular options include mid-wall height (approximately 36-48 inches from the floor) for a traditional wainscoting effect, or full wall coverage to the ceiling for contemporary, cohesive design. If you have a mirror above the vanity, terminating tiles just below the mirror's bottom edge creates clean visual boundaries. For spaces with significant moisture exposure near sinks, extending coverage higher provides additional protection. Our local design team can help you evaluate your specific bathroom layout and recommend the optimal height based on your vanity dimensions, mirror placement, and overall design aesthetic.
What's the best way to finish the top edge of subway tile?
Finishing the top edge of subway tile professionally requires using appropriate trim pieces or techniques to prevent an abrupt, unfinished appearance. Bullnose tiles remain the most popular solution, these specially designed pieces feature one rounded edge that creates smooth, polished transitions between tiled and untiled surfaces. Our bullnose trim options in various finishes coordinate with subway tile selections to maintain design cohesion. Alternatively, metal trim pieces (such as schluter strips) offer modern, industrial aesthetics while providing durability and protection. For a more minimalist approach, some installations use pencil trim or simply ensure cut edges are perfectly straight and well-grouted. The finishing method you choose should complement your overall design style, traditional spaces benefit from classic bullnose profiles, while contemporary designs might incorporate sleeker metal edging or even leave clean-cut edges for an intentionally raw aesthetic.
Can you mix different subway tile heights in different rooms?
Absolutely! Mixing subway tile heights across different rooms is not only acceptable but often recommended to optimize each space's unique requirements and design potential. Kitchens might feature backsplash-height tiling (15-18 inches), while bathrooms could incorporate floor-to-ceiling coverage in showers and mid-wall installations around vanities. Laundry rooms and powder rooms offer opportunities for creative accent walls at varying heights. The key to successful multi-height installations lies in maintaining design consistency through cohesive tile selection, grout colors, and overall aesthetic approach. Using tiles from our collection, such as our Montera series available in multiple sizes, ensures color and finish consistency even when installation heights vary by room. For accent flooring options that complement your wall tiles, consider our terrazzo mosaic tiles. Our design experts can help you develop a comprehensive tile plan that establishes visual continuity throughout your home while respecting each space's individual functional requirements and architectural characteristics. For additional inspiration on coordinating bathroom flooring with wall tiles, explore expert design resources.