Maintain subway tiles through daily wiping with mild dish soap and warm water, weekly deep cleaning with pH-neutral cleaners, and annual grout sealing. This simple routine prevents staining, preserves tile shine, and extends lifespan up to 50 years for ceramic and porcelain installations.
Essential Maintenance Schedule:
- Daily: Wipe tiles with damp cloth to remove moisture and cooking residue
- Weekly: Clean with pH-neutral cleaner or dish soap solution; scrub grout lines
- Monthly: Check for cracks, chips, or loose tiles
- Every 1-2 Years: Reseal grout to prevent water damage and staining
- Every 3-6 Months: Deep clean with baking soda paste for stubborn stains
What You Need: Soft sponges, microfiber cloths, mild dish soap, pH-neutral cleaner, distilled white vinegar (for non-stone tiles), grout brush, and grout sealer.
Avoid These Common Mistakes: Never use bleach, harsh chemicals, abrasive scrubbers, or vinegar on natural stone subway tiles, as these damage protective glazes and cause discoloration.
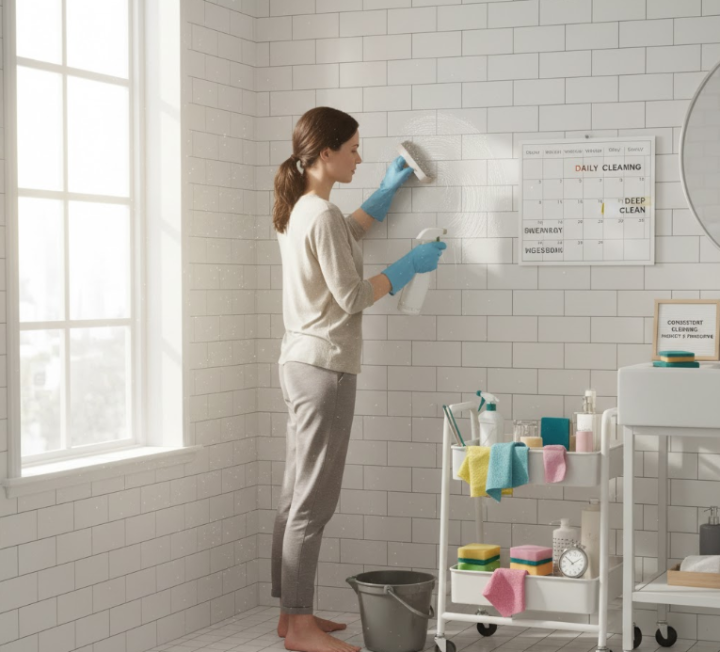
Subway tiles, ceramic or porcelain rectangular tiles popular in kitchens and bathrooms, require minimal maintenance when cleaned consistently. Their moisture-resistant, durable surfaces make them ideal for high-traffic areas. Follow this comprehensive guide to keep your subway tiles looking pristine for decades.
Daily and Weekly Cleaning
Consistent cleaning stands as the foundation for protecting the appearance and durability of your subway tiles. Building a steady maintenance schedule stops dirt, grime, and mineral buildup from forming, which becomes difficult to eliminate and can diminish the tile's surface brightness with time.
Selecting Appropriate Cleaning Products
Most routine cleaning situations require nothing more than a basic blend of gentle dish soap mixed with warm water. Dish soap's mild cleaning capabilities remove dirt and debris effectively while protecting the subway tile's finish. A pH-neutral cleaning solution works excellently too, particularly for preserving both tile surfaces and grout integrity.
Distilled white vinegar serves as an organic substitute for store-bought cleaners, working especially well against mineral buildup and soap residue. Stay away from aggressive chemicals, bleach products, and rough cleaners, since these damage tile finishes and grout material.
Proven Cleaning Methods
Keep subway tiles appearing vibrant and durable by establishing a schedule that handles both surface dirt and grout accumulation. Begin with a fast daily wipe using a gentle, moistened cloth or sponge, focusing on zones affected by moisture, cooking spray, or soap buildup. Address grout spaces during standard cleaning sessions to stop discoloration from developing.
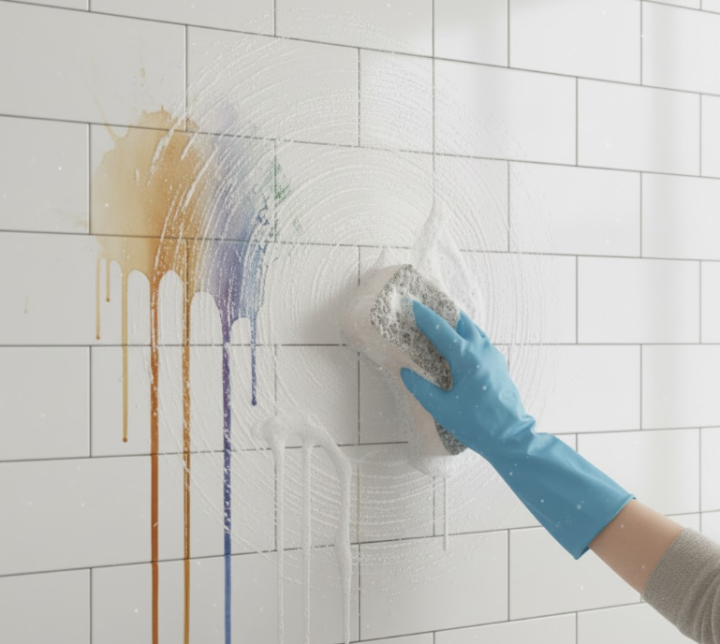
When dealing with more resistant stains, combine several drops of dish soap with warm water and work it in using a sponge, concentrating on any persistent areas. Scrub softly to prevent surface scratching, and consistently rinse completely using clean water. Complete the process by drying the section with a gentle towel to eliminate streaks and moisture collection.
Tackling Mineral Buildup
When you spot mineral deposits or hard water marks, a diluted vinegar mixture proves effective. Combine equal amounts of white vinegar and warm water, spread the mixture on the troubled spot, and allow it to rest for several minutes before softly scrubbing. Rinse completely and dry thoroughly.
Stopping Water Spots and Streak Formation
To prevent unattractive water spots and streaking, consistently dry the subway tiles fully following cleaning. Apply a soft, absorbent cloth or squeegee to eliminate remaining water. In high-humidity locations, install a dehumidifier to lower moisture concentrations. Adequate ventilation also plays a critical role in stopping water spots and mildew development.
Deep Cleaning and Grout Care
While regular cleaning maintains your subway tiles' appearance, deep cleaning becomes essential for handling stubborn stains, accumulated grime, and discolored grout. Schedule deep cleaning sessions every few months or more often, based on area usage. Understanding different tile material properties helps you select appropriate cleaning methods for your specific installation.
Removing Stubborn Stains
When facing difficult stains like grease, wine, or hard water deposits, a baking soda paste offers a gentle yet powerful cleaning answer. Combine baking soda with a minimal amount of water to create a paste. Spread the paste onto the stain, let it rest for several minutes, then scrub softly with a gentle brush. Rinse fully with clean water.
Should the stain remain, you might require a commercial tile and grout cleaning product designed specifically for subway tiles.
Grout Cleaning and Sealing
Grout, the substance filling spaces between tiles, frequently gets neglected but serves a critical function in your tiled surfaces' overall look. As time passes, grout can turn discolored, stained, and become a breeding location for mold and mildew. To clean grout, grab a grout brush or an old toothbrush to scrub the grout spaces with a combination of warm water and dish soap. For stronger stains, try a commercial grout cleaning product. Give special attention to tile corners and edges, where dirt and grime typically gather.
Grout sealing represents an investment in your subway tiles' long-term maintenance. Sealing grout establishes a protective shield that blocks water, stains, and mold. Apply a grout sealer following product guidelines, letting the sealer dry fully before adding a second application. Resealing grout every 1-2 years maintains its protective properties, with frequency depending on moisture exposure and traffic levels.
Preventing Mold and Mildew
Mold and mildew flourish in moist, humid settings. Adequate ventilation proves crucial, especially in kitchens and bathrooms. Activate exhaust fans to extract moisture from the air and manage humidity levels with a dehumidifier in damp zones.
Wipe your subway tiles and grout routinely to remove moisture and prevent dirt buildup. If you detect signs of mold or mildew, clean the impacted sections with a blend of bleach and water. Wear gloves and ensure proper ventilation when handling bleach.
Stain Removal
Subway tiles, despite their durability, can become vulnerable to various stains. Swift action and suitable cleaning techniques prove essential for removing these blemishes successfully. Browse tiles by color when selecting tiles that naturally hide stains better.
Common Stains and Removal Methods
Grease Stains: Apply a degreaser or blend of dish soap and warm water to the stain. Allow it to sit for several minutes, then softly scrub with a gentle sponge. Rinse completely with warm water and dry immediately.
Wine Stains: Act swiftly to eliminate wine stains since they can settle into the subway tile. Blot the stain with a clean cloth to soak up excess wine. Make a mixture of hydrogen peroxide and dish soap, spread it on the stain, and let it sit before scrubbing and rinsing.
Marker Stains: Test a small section with rubbing alcohol or commercial marker remover first. If the subway tile remains unaffected, spread the product on the stain, let it sit for several minutes, then wipe clean. Repeat when needed.
Hard Water Stains: Eliminate hard water stains with a commercial descaler or blend of white vinegar and water. Spread the solution on the stain, let it sit for several minutes, then scrub softly. Rinse thoroughly and dry the section. Consider specialty options like mosaic tiles for accent areas that add visual interest while maintaining easy cleaning.
Preventing Future Stains
To reduce stain risk, clean up spills immediately. Sealing your grout blocks stains from penetrating the tile surface. Using coasters and placemats protects your subway tiles from daily wear. Regular cleaning and maintenance stops dirt and grime buildup that contributes to stain development.

Preventive Measures
To extend the life of your subway tiles and preserve their pristine look, implementing proactive care becomes essential. Proper tile edge protection during installation prevents damage that requires extensive maintenance later.
Protecting Tiles from Scratches
Preventing scratches remains essential for preserving the pristine look of your subway tiles. Consistently use soft cleaning tools like sponges, microfiber cloths, or soft-bristled brushes. Avoid rough materials like steel wool or scouring pads that can scratch the tile surface. Exercise caution when positioning heavy objects on tiles, as they can create chips or cracks. Explore tiles by type to understand which materials offer the best scratch resistance for your needs.
Care for Subway Tiles in Busy Areas
Kitchens, bathrooms, and entryways face heavy use and moisture exposure, making them susceptible to wear. Establish a consistent cleaning schedule, regularly wiping surfaces to eliminate dirt and grime. Mop floors with a gentle cleaning formula and give close attention to grout lines since they collect dirt and stains. Consider porcelain tile options for high-traffic areas due to their superior durability and stain resistance.
Regular Inspection and Professional Services
Regularly examine your subway tiles for damage signs like cracks, chips, or loose tiles. Fix damage immediately to stop further deterioration. Early detection protects you from expensive replacements.
Although regular cleaning proves essential, situations may arise when deep cleaning or specialized stain removal becomes necessary. Consider contracting a professional tile care service with experience in tile maintenance. Professionals possess the expertise and equipment to handle challenging cleaning tasks and restore your subway tiles' shine. Staying informed about industry innovations helps you discover new maintenance products and techniques.
Conclusion
Maintaining subway tiles doesn't demand complicated routines or expensive products. Success lies in establishing consistent habits, selecting appropriate cleaning solutions, and addressing issues promptly before they escalate. From quick daily wipe-downs using mild soap solutions to quarterly deep cleaning sessions that target grout lines and stubborn stains, each maintenance step contributes to your tiles' lasting beauty and functionality.
Remember that prevention always outperforms correction. Seal your grout regularly, address spills immediately, and maintain proper ventilation in moisture-prone areas. These simple practices dramatically reduce the time and effort required for intensive cleaning while extending your subway tiles' lifespan. Whether you're installing new tiles or maintaining existing installations, following these guidelines ensures they remain a stunning focal point in your home for decades.
Take advantage of the $1 sample program at Nova Tile and Stone to test different finishes and colors in your space. Visit local tile showrooms for expert guidance on selecting low-maintenance options that fit your lifestyle.
Explore the complete tile selection to find materials perfect for your project. Browse tiles by size to identify dimensions that work best for your installation. Review the complete product catalog for comprehensive tile options and accessories.
For personalized assistance with tile selection and maintenance questions, contact our team directly. Learn more about our commitment to providing quality tile solutions and expert guidance throughout Northern Nevada and Northern California.
Frequently Asked Questions
How often should I seal my subway tile grout?
Seal your grout every 1-2 years to maintain optimal protection against water, stains, and mold. High-traffic areas like kitchen backsplashes and bathroom showers may require more frequent sealing, potentially every 12 months. Test your grout by placing a few drops of water on the surface. If the water beads up, your seal remains effective. If water absorbs into the grout, resealing becomes necessary. Always follow manufacturer guidelines for specific grout types, as some premium grouts feature enhanced stain resistance requiring less frequent maintenance.
Can I use vinegar on all types of subway tiles?
While vinegar works effectively on most ceramic tile options, avoid using it on natural stone varieties like marble, travertine, or limestone. The acidic nature of vinegar can etch and damage natural stone surfaces, dulling their finish over time. For natural stone subway tiles, stick to pH-neutral cleaners specifically formulated for stone care. Always test any cleaning solution in an inconspicuous area before applying it to the entire surface.
What's the best way to prevent soap scum buildup on shower subway tiles?
Prevent soap scum by squeegeeing shower walls immediately after each use to remove water droplets and soap residue. Install a water softener if you have hard water, as mineral content accelerates soap scum formation. Weekly cleaning with a mixture of dish soap and warm water keeps buildup minimal. For existing soap scum, apply a paste of baking soda and water, let it sit for 10 minutes, then scrub gently. Consider switching to liquid body wash instead of bar soap, as it produces less scum. Staying updated on modern bathroom trends can also provide helpful maintenance insights.
Are matte or glossy subway tiles easier to maintain?
Glossy subway tiles prove easier to clean because their smooth, non-porous surface resists staining and wipes clean effortlessly. Water spots and streaks show more prominently on glossy finishes, requiring more frequent drying. Matte finish tiles hide water spots better but can trap dirt in their slightly textured surface, demanding more scrubbing effort during cleaning. Understanding the differences between tile materials helps in making informed decisions. Browse tiles by style to compare various finish options. Your choice should balance aesthetic preferences with your willingness to perform regular maintenance.
How do I remove dried grout haze from subway tiles after installation?
Remove grout haze within 24-48 hours after installation for easiest results. Mix a commercial grout haze remover according to package directions and apply it to the affected tiles. Allow the solution to sit for the recommended time, then wipe with a damp sponge using circular motions. Rinse thoroughly with clean water and buff dry with a soft cloth. For stubborn haze, repeat the process. Always choose a grout haze remover compatible with your specific tile material to avoid damage. Check manufacturer guidelines or consult with tile professionals before application.