The herringbone subway tile layout creates a stunning zigzag pattern that instantly elevates kitchens and bathrooms with sophisticated visual interest. This classic arrangement takes traditional rectangular subway tiles and positions them at 45-degree angles to form a distinctive V-shaped weaving pattern that adds depth and movement to any wall. Whether you're planning a kitchen backsplash renovation or updating your bathroom, understanding herringbone subway tile patterns will help you achieve a designer look that combines timeless appeal with modern elegance.
Subway tiles have been a staple in interior design for over a century, originating in New York City's underground transit system. While the standard horizontal brick pattern remains popular, homeowners and designers are increasingly drawn to creative backsplash ideas that showcase personality and craftsmanship. The herringbone pattern delivers exactly that, transforming simple rectangular tiles into an eye-catching focal point. This layout works beautifully with various tile sizes, from petite 2x4-inch tiles to larger 3x12-inch planks, giving you flexibility to customize the scale and impact of your design.
In this comprehensive guide, we'll explore everything you need to know about installing a herringbone subway tile backsplash, from choosing the right materials to understanding installation techniques. You'll discover why this pattern continues to trend in modern subway tile patterns, learn practical tips for successful execution, and get inspired to bring this sophisticated look into your own home.
What Makes Herringbone Different from Other Subway Tile Layouts
The herringbone pattern stands apart from other subway tile layouts due to its distinctive angled arrangement. While traditional subway tile follows a running bond pattern with horizontal rows offset by half a tile, herringbone creates a dynamic zigzag effect by placing rectangular tiles at 45-degree angles. Each tile's short end meets the long side of the adjacent tile, forming continuous V-shaped columns that draw the eye across the surface.
This geometric arrangement requires more planning and precision than standard layouts, but the visual payoff is substantial. The pattern creates natural movement and texture that photographs beautifully and adds architectural interest to otherwise flat surfaces. According to industry research, patterned tile installations have seen increased demand as homeowners seek distinctive design elements that reflect personal style.
Herringbone vs. Chevron: Understanding the Distinction
Many people confuse herringbone with chevron subway tile patterns, but there's a key difference. In a true chevron pattern, the tiles are cut at angles so their ends meet to form perfect points, creating continuous zigzag lines. Herringbone, conversely, uses rectangular tiles with straight cuts, where the short end of one tile meets the long side of another at a right angle. This creates a broken zigzag effect rather than continuous points.
![]()
Both patterns offer sophisticated appeal, but herringbone is often more budget-friendly because it doesn't require custom tile cutting. The choice between these modern subway tile patterns ultimately depends on your aesthetic preference and project budget. If you're exploring different tile styles, consider viewing samples in person to see how light and shadow play across each pattern.
Choosing the Perfect Subway Tile for Your Herringbone Layout
Selecting the right tile is crucial for a successful herringbone installation. The pattern works best with rectangular tiles that have a length-to-width ratio of at least 2:1. Classic subway tile dimensions like 3x6, 2x8, or 3x12 inches are ideal choices that emphasize the zigzag pattern without overwhelming the space.
Material selection significantly impacts both aesthetics and durability. Porcelain tiles like the Perfection 2.5x8 Matte Porcelain offer exceptional water resistance and low maintenance, making them perfect for kitchen and bathroom applications. For those seeking a more reflective finish, glossy ceramic options create light-catching surfaces that make small spaces feel larger. The tile material you choose affects not only appearance but also cleaning requirements and longevity.
Color and Finish Considerations
While classic white subway tile remains eternally popular, don't overlook the impact of colored subway tile in herringbone arrangements. Soft grays, sage greens, or navy blues add personality without overwhelming the pattern's architectural beauty. When browsing tiles by color, consider how different hues will interact with your existing fixtures and cabinetry.
The grout color you select dramatically alters the final look. Subway tile with dark grout creates bold definition that emphasizes the herringbone pattern, making it the room's focal point. Conversely, matching grout colors produce a seamless, monochromatic effect that feels more subtle and sophisticated. For a striking contemporary look, the 3x12 Matte Porcelain pairs beautifully with charcoal grout to highlight the geometric pattern.
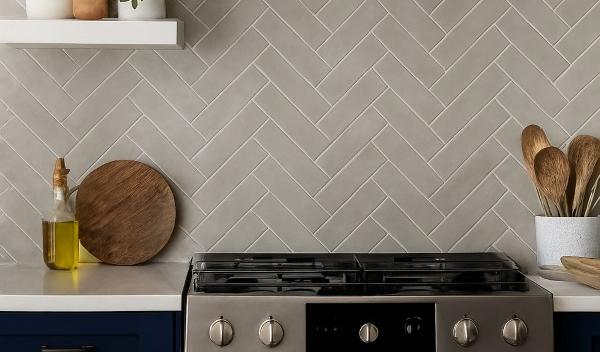
Herringbone Subway Tile Kitchen Ideas That Inspire
The kitchen is where herringbone patterns truly shine, particularly as backsplash installations. This layout transforms the space between countertops and upper cabinets into a design statement that complements both traditional and contemporary kitchen styles. The angled pattern adds visual interest without competing with other design elements, making it versatile enough for minimalist and maximalist kitchens alike.
Consider these popular subway tile kitchen ideas featuring herringbone layouts:
- Full-height backsplashes: Extend the pattern from counter to ceiling for dramatic impact in kitchens with open shelving or limited upper cabinets
- Behind-range feature walls: Create a focal point by using herringbone exclusively behind the cooktop, with standard subway tile elsewhere
- Two-tone designs: Combine two complementary tile colors in the herringbone pattern for added depth and contemporary flair
- Mixed material approaches: Integrate mosaic tile accents within the herringbone layout for textural variety
The key to successful kitchen installations is ensuring the pattern aligns properly with your countertop and upper cabinet edges. Professional installers typically center the pattern on the wall or create a balanced starting point that makes the layout appear intentional rather than haphazard.
Practical Benefits Beyond Beauty
Beyond aesthetics, herringbone subway tile offers practical advantages for kitchen environments. The multiple grout lines create texture that hides minor splatters better than smooth surfaces, though regular cleaning remains important. Porcelain options are particularly heat-resistant, making them safe behind cooking surfaces. Additionally, the intricate pattern often makes small kitchen spaces feel more designed and intentional, adding perceived value to your home.
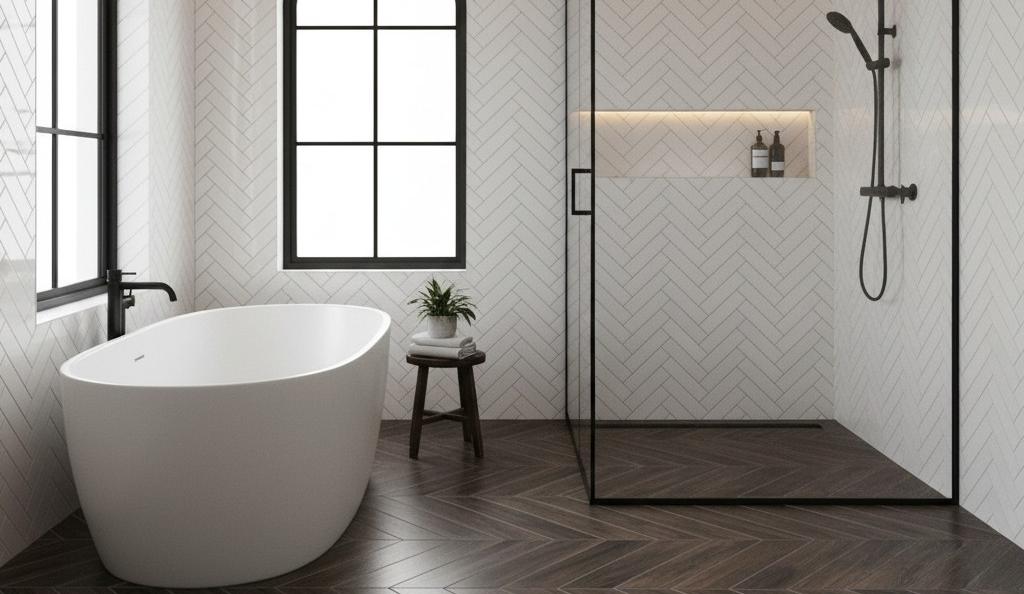
Bathroom Trends: Herringbone in Wet Spaces
Current subway tile bathroom trends showcase herringbone patterns in shower enclosures, tub surrounds, and accent walls. The pattern works particularly well in these spaces because it draws the eye upward, making ceiling heights feel more generous. In shower applications, herringbone creates natural water drainage channels that complement proper waterproofing systems.
For bathroom installations, consider these applications:
Shower Walls:
Use smaller 2x6 or 2.5x8 tiles to create an intimate, spa-like feeling in enclosed shower spaces. The Lucida 3x9 Glossy Ceramic provides a luminous finish that brightens even windowless bathrooms.
Powder Room Accent Walls:
In small half-baths, a single wall of herringbone tile behind the vanity creates a dramatic focal point without overwhelming the limited square footage.
Bathtub Surrounds: Frame your soaking tub with herringbone tile that coordinates with simpler floor patterns for a cohesive but not matchy-matchy look.
When planning bathroom projects, consult NKBA planning guidelines to ensure your tile selections meet appropriate wet-area specifications and proper installation techniques for lasting performance.
Installation Essentials: Step-by-Step Guide to Laying Herringbone
Installing herringbone subway tile requires more skill than standard layouts, but DIY-ers with tile experience can achieve professional results by following systematic approaches. The key is careful planning, precise measurements, and patience throughout the process.
Mini Step-by-Step Installation Guide
Step 1:
Plan your layout start by finding the center point of your wall and marking vertical and horizontal guidelines. Dry-lay your pattern on the floor first to understand how tiles fit together and where cuts will fall. This planning phase prevents costly mistakes and ensures your pattern centers attractively on the wall.
Step 2:
Prepare the surface ensure your wall is clean, level, and properly primed. For wet areas, install appropriate waterproofing membranes before tile work begins. Proper substrate preparation is crucial for long-term adhesion and preventing water damage.
Step 3:
Begin tiling from center apply thin-set mortar and start placing tiles at your center point, working outward in diagonal rows. Use tile spacers consistently to maintain even grout lines. The herringbone pattern requires you to constantly alternate tile direction, so mark your tiles lightly if needed to track orientation.
Step 4:
Make precise edge cuts as you reach wall edges, you'll need to cut tiles at 45-degree angles to maintain the pattern. A wet saw with an angle guide ensures clean, accurate cuts. Take time with these edge pieces, as sloppy cuts will be immediately visible in the finished installation.
Step 5:
Grout and seal after adhesive cures (typically 24-48 hours), apply grout carefully, working it into all joints thoroughly. Clean excess grout promptly with a damp sponge, then allow proper curing time before sealing. Quality sealer protects against stains and moisture penetration, especially important in high-use areas.
Comparing Herringbone to Other Popular Patterns
Understanding how herringbone compares to alternative layouts helps you make informed design decisions. Each pattern offers distinct visual characteristics and installation considerations.
Pattern | Visual Effect | Installation Difficulty | Best For | Cost Factor |
Herringbone | Zigzag movement, sophisticated | Moderate-High | Feature walls, backsplashes | Higher (more cuts) |
Running Bond | Classic, horizontal lines | Easy | Large areas, budget projects | Lower |
Vertical Subway Tile | Height emphasis, modern | Easy-Moderate | Small spaces, contemporary design | Moderate |
Basketweave Subway Tile | Woven texture, traditional | Moderate | Floors, vintage aesthetics | Moderate |
Stack Bond | Grid-like, minimalist | Easy | Modern spaces, wall features | Lower |
Diagonal | Dynamic angles, spacious feel | Moderate | Floors, unique walls | Moderate-High |
This comparison reveals that while herringbone requires more installation expertise than simpler patterns, its distinctive appearance justifies the additional effort and expense for homeowners seeking standout design elements.
Pros and Cons of Herringbone Subway Tile Layout
Like any design choice, herringbone patterns come with advantages and considerations worth weighing before committing to the installation.
Advantages
- Timeless sophistication: The pattern has remained stylish for decades and shows no signs of dating quickly
- Visual interest: Creates dynamic movement that elevates simple subway tile into architectural statement
- Versatility: Works with various tile sizes, colors, and materials to suit different design aesthetics
- Perceived value: The intricate pattern suggests careful design consideration and quality craftsmanship
- Directional flexibility: Can be oriented vertically, horizontally, or at angles to achieve different effects
- Hides imperfections: The busy pattern camouflages minor wall irregularities better than simpler layouts
Considerations
- Higher installation cost: Requires more labor time and expertise than standard subway tile layouts
- Increased material waste: Angled cuts at edges result in more tile waste, typically 15-20% compared to 10% for running bond
- Potential for pattern fatigue: In very large installations, the busy pattern might feel overwhelming
- More complex planning: Pattern requires careful layout planning to ensure proper centering and edge treatments
- Grout line maintenance: More grout lines mean more surfaces to clean and maintain over time
- Limited DIY-friendliness: Best suited for experienced tile installers or professional installation
For homeowners exploring products available at specialized tile retailers, discussing these factors with knowledgeable staff helps determine if herringbone suits your specific project needs and skill level.
Design Tips for Maximizing Herringbone Impact
Successfully executing a herringbone layout involves more than proper installation technique. These design strategies ensure your finished project looks intentional and professionally executed:
Scale to your space: Larger tiles create bolder patterns appropriate for spacious kitchens, while smaller tiles suit intimate powder rooms and smaller backsplashes. Match tile size to room proportions for balanced aesthetics.
Consider edge treatments: Plan how the pattern will terminate at inside and outside corners. Metal trim pieces or bullnose tiles create polished edges that look finished and professional.
Mind your grout joints: Consistent spacing is crucial in herringbone patterns where irregularities become immediately obvious. Invest in quality spacers and take time to maintain even joints throughout installation.
Coordinate with adjacent surfaces: Ensure your herringbone tile complements rather than conflicts with nearby materials. Consider how the pattern interacts with countertops, flooring, and other finishes in the space.
Lighting matters: Position lighting to cast shadows that accentuate the pattern's three-dimensional quality. Under-cabinet lighting for backsplashes or sconces for bathroom walls enhance the zigzag effect.
Shopping Smart: Finding Quality Tiles Locally
When sourcing materials for your herringbone project, working with specialized tile retailers offers distinct advantages over big-box stores. Local suppliers typically carry wider selections of sizes, colors, and finishes that allow for truly customized designs. They also provide expert advice on proper materials for specific applications and can help calculate accurate quantities including waste factors.
Shopping locally at dedicated tile showrooms lets you see and feel samples in person, which is invaluable when choosing colors and finishes. Lighting in showrooms more accurately represents how tiles will look in your home compared to warehouse fluorescent lighting. Additionally, local retailers often maintain relationships with skilled installers they can recommend if you decide professional installation is right for your project.
Before visiting showrooms, take photos of your space, note measurements, and collect samples of existing finishes you'll coordinate with. This preparation allows design consultants to provide targeted recommendations that suit your specific situation. Don't hesitate to contact specialists with questions before your visit to maximize the efficiency of your shopping experience.
Maintenance and Long-Term Care
Proper maintenance preserves the beauty of your herringbone installation for decades. Porcelain and ceramic subway tiles are inherently durable and low-maintenance, but the pattern's multiple grout lines require attention to prevent discoloration and staining.
For daily cleaning, wipe surfaces with a damp microfiber cloth or mild pH-neutral cleaner. Avoid harsh chemicals that can degrade grout or damage tile finish. In kitchens, address grease splatters promptly before they set into grout lines. For bathrooms, squeegee shower walls after use to minimize water spots and soap scum buildup.
Annual deep cleaning should include grout line scrubbing with a soft brush and appropriate grout cleaner. Reapply grout sealer every 1-2 years in wet areas or high-traffic zones to maintain stain resistance. If grout becomes deeply stained over time, professional grout dyeing or replacement can refresh the installation without replacing tiles.
Inspect caulk joints where tile meets tubs, counters, or other fixtures annually. Replace deteriorated caulk promptly to prevent water infiltration that could damage substrate materials behind your beautiful herringbone tile.
Conclusion: Bringing Timeless Elegance Home
The herringbone subway tile layout represents a perfect marriage of classic appeal and contemporary style. This sophisticated pattern transforms ordinary rectangular tiles into extraordinary design statements that enhance kitchens, bathrooms, and any space craving visual interest. While installation requires more planning and expertise than standard layouts, the distinctive zigzag pattern delivers lasting beauty that increases your home's aesthetic appeal and perceived value.
Whether you're drawn to crisp white tile with contrasting grout or exploring bold colored options, herringbone arrangements adapt beautifully to various design preferences. The pattern's versatility works equally well in traditional farmhouse kitchens, sleek modern bathrooms, and everything in between. By carefully selecting appropriate tile sizes, colors, and finishes, you can create a customized look that reflects your personal style while benefiting from a time-tested layout that won't feel dated in years to come.
Ready to start your herringbone tile project? Visit our showroom to explore our extensive tile collection and speak with design experts who can guide your selection. From classic subway tiles to specialized finishes, we offer the quality materials and knowledgeable support to help you achieve professional-looking results that you'll love for years to come.
Frequently Asked Questions
Is herringbone tile more expensive than regular subway tile patterns?
Yes, herringbone installations typically cost 15-30% more than standard running bond patterns due to increased labor time, the need for precise angled cuts, and higher material waste. However, many homeowners find the distinctive visual impact worth the additional investment, especially for focal point areas like kitchen backsplashes.
Can I install herringbone tile as a DIY project?
Experienced DIY-ers with previous tiling experience can tackle herringbone installations, but beginners should start with simpler patterns first. The layout requires precise measurements, consistent spacing, and accurate angle cuts at edges. If you're unsure, professional installation ensures proper execution and long-term durability.
What grout color works best with herringbone subway tile?
Grout color depends on your desired effect. Light grout creates a seamless, cohesive look that blends with the tile, while dark grout provides strong contrast that emphasizes the zigzag pattern. Medium gray grout offers a balanced option that hides dirt better than white while remaining less stark than charcoal.
How do I clean grout lines in a herringbone pattern?
Regular maintenance with pH-neutral cleaners and soft brushes keeps grout looking fresh. For deeper cleaning, use oxygen-based cleaners or a paste of baking soda and water, scrubbing gently along grout lines. Seal grout after cleaning to protect against future staining, especially in kitchens and bathrooms.
What tile size is best for herringbone layouts?
Tiles measuring 2x6, 2.5x8, or 3x12 inches work beautifully in herringbone patterns. Smaller tiles create more intricate patterns suited to compact spaces, while larger tiles make bolder statements in expansive areas. Choose sizes proportional to your room dimensions for best visual balance.