The Rise of Floor-to-Ceiling Elegance
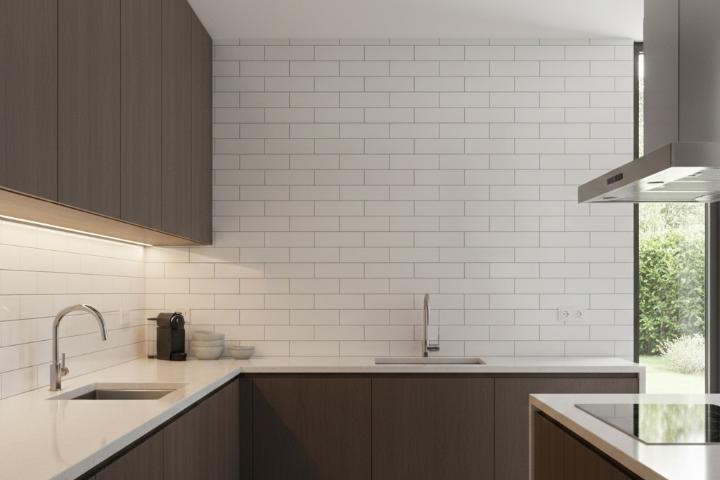
Full-height subway tiles are transforming kitchens from ordinary to extraordinary. These classic rectangular tiles extend from countertop to ceiling, creating a seamless, sophisticated look that maximizes visual impact. Homeowners increasingly choose this bold design statement for its ability to make spaces feel larger and more cohesive.
The traditional backsplash stops at about 18 inches above the counter. But why limit yourself? Taking subway tiles to the ceiling offers dramatic visual appeal and practical benefits. This approach works beautifully in both contemporary and traditional settings, proving its versatility across design styles.
However, this design choice comes with considerations. Material costs increase, installation becomes more complex, and the commitment level rises. Understanding both advantages and drawbacks helps you make an informed decision. This guide explores everything you need to know about full-height kitchen backsplash installations, from aesthetic benefits to budget planning.
Why Full-Height Subway Tile Backsplashes Matter
Full-height installations offer more than visual drama. They provide functional advantages that standard backsplashes cannot match. The extended coverage protects walls from cooking splatters, steam, and moisture damage. This becomes especially valuable in busy kitchens where cooking happens daily.
Key Benefits Include:
- Enhanced wall protection from grease, moisture, and staining
- Seamless, cohesive appearance that eliminates visual breaks
- Easier cleaning with wipeable surfaces replacing painted drywall
- Increased home value through premium material choices
- Timeless aesthetic that transcends temporary trends
The design impact cannot be overstated. Vertical lines created by subway tiles draw the eye upward, making ceilings appear higher. This optical illusion benefits smaller kitchens or spaces with standard ceiling heights. The unbroken tile surface creates architectural interest without overwhelming the space.
Professional designers often recommend this treatment for open-concept layouts. The consistent material creates visual continuity between kitchen and adjacent living areas. This approach works particularly well when coordinated with other tile selections throughout your home.
Practical Applications and Design Ideas
Classic White Creates Bright, Airy Spaces
White subway tiles remain the most popular choice for full-height installations. Their reflective surface bounces light around the room, enhancing brightness naturally. This makes kitchens feel more spacious and welcoming. The neutral backdrop allows cabinet colors, hardware, and accessories to become focal points.
Consider glossy subway tiles for maximum light reflection. These work beautifully in kitchens with limited natural light. Pair them with contrasting grout for traditional appeal, or match grout closely for a seamless modern look. The versatility accommodates various design preferences effortlessly.
Bold Colors Make Dramatic Statements
Black subway tiles create striking contemporary kitchens. This bold choice works best in spaces with ample natural light or when balanced with lighter cabinetry. The dark backdrop makes metallic fixtures and colorful dishware pop dramatically. Maintenance becomes easier as minor stains blend rather than standing out.
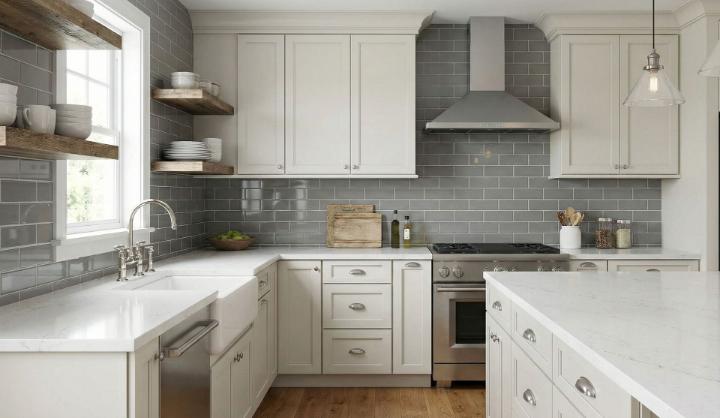
Grey subway tiles offer sophisticated middle ground. They provide depth without the starkness of white or intensity of black. This neutral works exceptionally well in transitional kitchens bridging traditional and modern aesthetics. Variations from light to charcoal accommodate different lighting conditions beautifully.
Blue subway tiles bring calming, coastal vibes to kitchen spaces. From soft powder blue to deep navy, these tiles create personality and character. They pair wonderfully with brass or gold fixtures for warmth. Consider this option if your kitchen overlooks water or you want beachy ambiance.
Green subway tiles connect kitchens to nature. Sage, mint, and forest green options have surged in popularity recently. These earthy tones create soothing environments perfect for family gathering spaces. They complement natural wood cabinetry and butcher block countertops exceptionally well.
Premium Materials Elevate Design Quality
Marble subway tiles bring luxury and natural beauty. Each tile features unique veining patterns, creating one-of-a-kind installations. While more expensive, marble elevates kitchen aesthetics significantly. Proper sealing maintains beauty and prevents staining over time.
Porcelain subway tiles offer durability and versatility, making them a trusted choice for both designers and homeowners. Modern manufacturing creates options mimicking natural stone, wood, or concrete, allowing for a wide range of aesthetic possibilities.
These tiles resist moisture, staining, and wear better than many alternatives, ensuring long-lasting performance in kitchens, bathrooms, and other high-traffic areas. To better understand the broader history, materials, and applications of tiles in architecture and design, see the comprehensive overview on Tile.
Their low maintenance requirements appeal to busy households seeking beauty without constant upkeep. For more design inspiration and professional guidance on integrating porcelain subway tiles into your projects, resources from the National Kitchen & Bath Association provide valuable insights and industry standards.
Ceramic subway tiles provide budget-friendly elegance. Available in countless colors, finishes, and sizes, ceramic accommodates nearly any design vision. These tiles meet industry standards for quality and durability, ensuring long-lasting performance. Their affordability allows full-height installations without breaking budgets.
Finish Choices Impact Overall Aesthetic
Matte subway tiles create sophisticated, contemporary appearances. Their non-reflective surface hides water spots and fingerprints better than glossy alternatives. This practical benefit suits families with young children or high-traffic kitchens. Matte finishes complement modern minimalist design philosophies beautifully, and industry events like Coverings showcase how these finishes continue to inspire modern design trends.
Glossy finishes maximize light reflection and create classic looks. They're easier to wipe clean than matte surfaces, making maintenance simpler. However, they show water spots and streaks more readily. Consider your cleaning preferences when choosing between finishes.
Pros and Cons at a Glance
Advantages of Full-Height Subway Tile
Visual Impact:
- Creates dramatic focal point that immediately draws attention
- Makes ceilings appear taller through continuous vertical lines
- Provides cohesive, finished appearance without visual interruptions
- Adds architectural interest and sophisticated design element
Practical Benefits:
- Protects entire wall surface from cooking damage and moisture
- Eliminates need for repainting upper wall sections regularly
- Simplifies cleaning with wipeable tile instead of painted drywall
- Increases home resale value through premium material installation
Design Flexibility:
- Accommodates numerous color options to match any palette
- Works with various tile sizes for customized looks
- Complements both traditional and contemporary kitchen styles
- Allows creative pattern variations including herringbone and vertical stack
Drawbacks to Consider
Cost Considerations:
- Requires significantly more material than standard backsplash height
- Increases labor costs due to additional installation time required
- May need scaffolding or specialized equipment for ceiling access
- Premium tiles multiply expenses quickly across large surface areas
Installation Complexity:
- Demands experienced installers familiar with proper techniques
- Requires careful planning for electrical outlets and switches
- Creates more extensive demolition if changes needed later
- Takes longer to complete, extending kitchen renovation timeline
Design Commitment:
- Represents bold choice that's expensive to change later
- May feel overwhelming in very small kitchen spaces
- Limits flexibility for future style updates without major renovation
- Requires cohesive design vision for successful execution
Comparison: Full-Height vs. Standard Backsplash
Feature | Full-Height Subway Tile | Standard Backsplash |
Material Cost | $800-$3,000+ | $200-$600 |
Labor Cost | $1,500-$4,000 | $400-$1,000 |
Installation Time | 3-5 days | 1-2 days |
Visual Impact | Dramatic, architectural | Functional, subtle |
Wall Protection | Complete coverage | Partial, splash zones only |
Cleaning Ease | Entire wall wipeable | Mixed surfaces to maintain |
Design Flexibility | Major commitment | Easier to change later |
Space Perception | Makes room feel larger | Neutral impact |
Resale Appeal | Premium feature | Standard expectation |
Step-by-Step: Planning Your Full-Height Installation
Step 1: Measure and Calculate Materials
Measure your wall dimensions carefully from countertop to ceiling. Include windows, doors, and any architectural features requiring cuts. Add 10-15% extra material for cuts, breakage, and future repairs. Use these measurements when exploring tile options to ensure accurate budgeting.
Step 2: Select Tiles and Grout
Choose tiles based on your kitchen's style, lighting, and existing finishes. Consider shopping by style to narrow overwhelming options. Select grout color carefully, as it significantly impacts final appearance. Request samples to view in your actual space before committing.
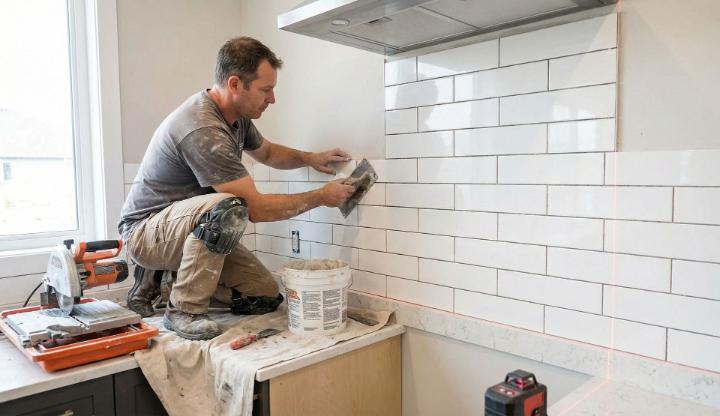
Step 3: Find Qualified Installation Professionals
Research certified tile installers with full-height experience. Check references and view completed projects similar to yours. Verify proper licensing and insurance coverage. Quality installation following proper standards ensures lasting beauty and performance.
Step 4: Prepare Your Space
Remove existing backsplash materials and repair wall damage. Ensure walls are level, plumb, and properly prepared for tile adhesion. Address any plumbing or electrical work before installation begins. Protect countertops, cabinets, and flooring from construction debris and damage.
Step 5: Plan for Kitchen Downtime
Expect your kitchen to be partially unavailable during installation. Set up temporary cooking space elsewhere in your home. Plan meals requiring minimal preparation during this period. Factor in drying time for adhesive and grout before using the kitchen normally.
Finding the Right Materials for Your Project
Selecting quality materials determines your project's success and longevity. Professional-grade tile suppliers offer superior products backed by warranties and expert guidance. They understand how different materials perform in various applications and environments.
Working with specialists provides access to exclusive options unavailable at big-box retailers. Many offer sample programs letting you test tiles in your actual space before purchasing. This eliminates costly mistakes and ensures satisfaction with your final selection.
Consider the complete installation system, not just the tile itself. Proper substrate preparation, quality adhesive, and appropriate grout all contribute to lasting results. Local tile experts can recommend complete solutions suited to your specific project requirements.
Professional suppliers often provide installation referrals to qualified contractors. This connection ensures your beautiful tiles receive proper installation following industry best practices. The relationship between quality materials and skilled installation cannot be overstated.
Many suppliers offer design consultations helping visualize your finished space. They understand how different tiles interact with lighting, cabinet colors, and overall aesthetics. This expertise proves invaluable when making decisions affecting your home's appearance for years to come.

Maintenance Considerations for Long-Term Beauty
Full-height tile installations require regular but simple maintenance. Porcelain tiles demand minimal care, typically just wiping with mild detergent and water. Avoid abrasive cleaners that can scratch surfaces or damage grout over time. Establish cleaning routines to maintain beauty effortlessly.
Grout sealing protects against staining and moisture penetration. Most installations benefit from annual sealing, though frequency depends on grout type and kitchen use. This preventive maintenance extends your installation's life significantly. Professional tile suppliers can recommend appropriate sealers for your specific materials.
Address any damaged tiles promptly to prevent moisture intrusion behind the installation. Keep extra tiles from your original purchase for repairs. Small chips or cracks can often be repaired without replacing entire tiles. Maintaining your investment ensures decades of beauty and function.
The durability rating of your chosen tile affects long-term maintenance needs. Understanding hardness scales helps set realistic expectations for wear resistance. Premium materials may cost more initially but require less maintenance and replacement over time.
Conclusion
Full-height subway tile backsplashes represent significant design decisions with lasting impact. They offer undeniable aesthetic appeal, practical benefits, and potential home value increases. The investment requires careful consideration of budget, timeline, and long-term design vision.
The pros include dramatic visual impact, complete wall protection, and timeless elegance. The cons involve higher costs, installation complexity, and major commitment. Weighing these factors against your specific needs and preferences guides the right choice.
Quality materials and professional installation ensure successful outcomes. Expert tile retailers provide guidance throughout the selection and planning process. Their knowledge helps avoid common pitfalls while maximizing your investment's value.
Whether you choose classic white, bold colors, or premium natural stone, full-height subway tiles transform ordinary kitchens into extraordinary spaces. The key lies in thoughtful planning, quality materials, and skilled execution.
Ready to explore options for your kitchen transformation? Connect with tile professionals who can help bring your vision to life. Request samples, discuss your project requirements, and discover how full-height subway tiles can elevate your home's design.
Frequently Asked Questions
How much does a full-height subway tile backsplash cost?
Full-height installations typically cost $2,300-$7,000 including materials and labor. Standard subway tiles run $5-$15 per square foot, while premium options reach $20-$50 per square foot. Installation labor adds $10-$25 per square foot. Total costs depend on tile selection, wall size, kitchen complexity, and regional labor rates. Higher ceilings and intricate patterns increase expenses.
What is the best grout color for subway tile backsplashes?
Grout color dramatically impacts the final appearance. White or light grout creates seamless, contemporary looks with white tiles. Contrasting dark grout adds definition and traditional character. Matching grout closely to tile color minimizes visual grid lines for subtle elegance. Consider maintenance when selecting grout, as lighter colors show stains more readily but dark grout conceals everyday wear better.
Can I install subway tile backsplash to the ceiling myself?
While DIY installation is possible with proper tools and experience, full-height projects present significant challenges. Working at ceiling height requires scaffolding and creates physical strain. Achieving level, plumb installations across large surfaces demands expertise. Mistakes become costly and time-consuming to correct. Most homeowners achieve better results hiring qualified professionals for full-height installations.
How do I clean and maintain full-height subway tile?
Regular cleaning with mild dish soap and water maintains tile beauty. Wipe surfaces weekly to prevent grease buildup. Use non-abrasive cleaners to avoid scratching glossy finishes. Seal grout annually to prevent staining and moisture damage. Address spills promptly, especially acidic substances on natural stone tiles. Avoid harsh chemicals that can damage grout or tile finishes over time.
What subway tile size works best for full-height backsplashes?
Traditional 3x6-inch subway tiles work beautifully for full-height installations. Larger formats like 4x12 or 6x12 tiles create more contemporary looks and reduce grout lines. Smaller tiles suit detailed patterns or compact spaces better. Consider ceiling height when selecting size. Taller walls accommodate larger tiles more proportionally, while standard 8-foot ceilings work well with traditional dimensions.