Design a subway tile layout for your pantry backsplash by first assessing your space dimensions, then selecting tile size (standard 3x6 inch or oversized 4x12 inch), choosing a surface finish (glossy for dark pantries, matte for bright spaces), and implementing a layout pattern that complements your design style. The most popular patterns include offset brick (traditional, forgiving installation), herringbone (adds 20-30% to installation cost but creates visual interest), vertical stacked (makes low ceilings appear taller), and horizontal straight lay (modern, minimalist aesthetic).
For optimal results, match your tile selection to pantry function: moisture-resistant glossy finishes for beverage stations, heat-resistant materials behind small appliances, and matte textures for farmhouse or industrial styles. Professional installation ensures proper surface preparation, precise tile alignment, and long-lasting grout integrity, with complex patterns like basketweave or diagonal arrangements requiring advanced technical expertise.
This comprehensive guide examines optimal subway tile arrangements, professional installation strategies, and critical factors for creating a stylish and functional pantry backsplash that delivers both lasting beauty and everyday performance.
Understanding Your Pantry Backsplash Requirements
Creating an effective pantry backsplash extends beyond selecting attractive subway tiles. Execute careful evaluation of spatial dimensions, operational requirements, and illumination characteristics to develop solutions that elevate both aesthetic quality and practical utility.
Evaluate Your Pantry Dimensions and Layout
Your pantry's spatial configuration determines how backsplash design should address efficiency and visual impact. In compact butler's pantries, install full-height backsplashes extending from countertops through upper cabinetry to generate visually expansive effects. For walk-in pantries featuring open shelving, implement half-height backsplashes behind work zones.
Straight, unobstructed surfaces accommodate traditional subway tile patterns effectively, while angled layouts may require custom tile cuts to maintain alignment. When your pantry incorporates multiple workstations, maintain consistent grout line alignment to strengthen visual unity.
Determine Pantry Function and Design Direction
Design your pantry's backsplash around daily operational patterns. In preparation-intensive pantries, prioritize moisture-resistant and stain-repellent materials. For beverage stations, emphasize heat-resistant tile options behind appliances.
Traditional or farmhouse-style pantries benefit from handcrafted-appearance subway tiles with slightly irregular edges, whereas modern designs perform best with stacked arrangements or glossy finishes for streamlined visual impact.
Address Lighting Conditions
Illumination significantly influences both visual presentation and practical functionality. In well-illuminated pantries with natural light, select matte subway tiles to diffuse brightness and reduce glare. In dimly lit pantries, choose glossy or reflective finishes to amplify available light.
Under-cabinet lighting enhances task visibility and highlights tile texture and pattern definition, especially in herringbone or beveled designs. For limited-light pantries, select light-toned tiles such as white or soft neutrals to ensure superior light distribution.
Selecting Appropriate Subway Tile Size and Surface Finish
Standard Versus Oversized Subway Tile Formats
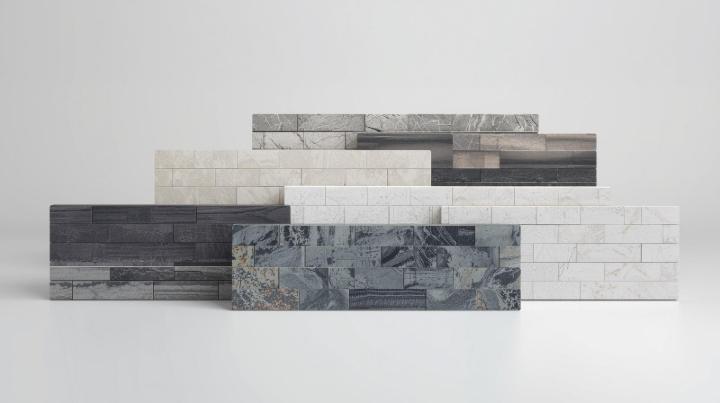
Standard 3x6 inch subway tiles remain versatile selections, adapting to various layout patterns including brick offset, herringbone, and basketweave designs. This dimension performs well in both compact and spacious pantries.
For sleek, contemporary aesthetics, oversized subway tiles measuring 4x12, 3x8, or 6x12 inches minimize visual interruptions and work effectively in walk-in pantries with open shelving. Consider our Bristol 3x8 Glossy Porcelain Subway Tile, featuring six sophisticated colors with Italian craftsmanship that create refined aesthetics perfect for pantry backsplashes.
Surface Finish Options
Glossy Finish - Reflects substantial light, excellent for dark or windowless pantries. Highly water-resistant and easy to clean, ideal for beverage stations or food prep areas. Shows fingerprints and water spots more readily.
Matte Finish - Provides modern, understated aesthetics perfect for contemporary, industrial, or farmhouse-style pantries. Minimizes glare, shows fingerprints less prominently, but may require slightly more cleaning effort due to porous nature.
Polished Finish - Delivers mirror-like appearance with enhanced color vibrancy, excellent for luxurious designs. Requires frequent wiping to prevent smudges. Works best with controlled lighting.
Satin Finish - Balances between glossy and matte, offering soft glow without excessive shine. Versatile for both classic and modern pantry designs with easier maintenance than glossy surfaces. Understanding ceramic versus porcelain tile properties helps determine which finish performs best for your specific needs.
Essential Subway Tile Layout Patterns
Horizontal Straight Lay Pattern
The horizontal straight lay pattern ranks among the simplest arrangements, making it excellent for contemporary and minimalist pantry designs. Align subway tiles in perfect rows and columns, maintaining uniform grout lines creating structured, grid-like appearances. This pattern streamlines installation and minimizes tile cuts, though wall imperfections become more noticeable. For best results, ensure tiles meet ANSI A137.1 standards for dimensional accuracy.
Offset or Brick Pattern
The offset brick pattern represents one of the most iconic arrangements. Each tile row staggers by half the width, closely resembling classic brickwork. This design introduces subtle movement through staggered grout lines and naturally disguises minor uneven surfaces, making it excellent for older homes.
Consider our 3x12 subway tiles, available in multiple elegant colors. The elongated format paired with matte finish adds depth and contemporary sophistication, ideal for creating dramatic statements in pantry backsplashes.
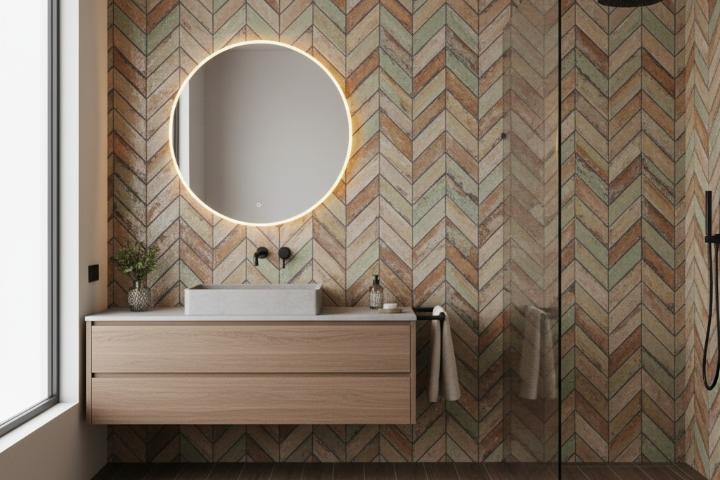
Herringbone
Herringbone layouts arrange subway tiles in 45-degree or 90-degree zigzag patterns, creating striking geometric effects. This layout performs particularly well for accent walls or pantries requiring bold focal points, as angled arrangements enhance spatial depth. Especially beneficial in pantries with high ceilings where directional movement amplifies vertical space. Contrasting grout enhances pattern details, while matching grout creates seamless, elegant finishes. Professional installers certified by the Ceramic Tile Education Foundation can ensure precise execution of this complex pattern.
Vertical Stacked
Vertical stacked layouts arrange subway tiles in aligned vertical columns. This height-enhancing pattern performs exceptionally well in compact or low-ceilinged pantries, as vertical orientation elongates walls and makes spaces feel taller. Execute this layout with large format subway tiles such as 3x12 or 4x12 inches for optimal visual balance.
Diagonal and Basketweave Patterns
Diagonal patterns transform tiles into 45-degree diamond arrangements, breaking up long walls and creating expansive feels in small spaces. Basketweave patterns incorporate horizontal and vertical tile pairs mimicking woven fabric, introducing layered textures ideal for feature walls. Both require precise cutting and expert craftsmanship, resulting in higher material waste but stunning visual results. Consider our Linear 5x10 Glossy 3D Decorative Subway Tile for adding dimensional depth to these intricate patterns.
Integrating Design Components and Practical Elements
Decorative Accents and Storage Solutions
Personalize subway tile backsplashes by incorporating contrasting rows of patterned or textured tiles to create subtle focal points defining different pantry sections. Glass, natural stone, or metal trim pieces add refined touches, framing subway tiles for polished finishes. Border tiles introduce structure and definition, particularly when using single tile colors. Following proper tile edge protection techniques ensures professional-quality results.
Incorporate floating shelves above subway tile backsplashes for accessible storage of frequently used items. Wooden shelves add warmth and contrast, while metal or glass shelves maintain contemporary feels. Wall-mounted racks, hooks, and stainless steel rails with hanging baskets optimize backsplash areas, making spaces more efficient without compromising design.
For professional design guidance, our free design consultation service streamlines tile selection and storage integration, ensuring every design choice achieves optimal style and functionality.

Choosing Subway Tile Styles Complementing Home Design
Marble Look Subway Tiles
Marble look subway tiles combine sophistication of natural marble with practical benefits of ceramic or porcelain tiles. These tiles replicate intricate veining and soft color variations found in Carrara, Calacatta, and Statuario marbles, offering luxurious aesthetics without high maintenance.
| Classic Kitchens | Modern Interiors | Grandiose Settings |
|---|---|---|
| Enhances refined elegance by complementing detailed cabinetry and neutral color palettes | Creates bold visual contrast with dark cabinetry and striking hardware | Elevates ambiance with premium aesthetics when accented by gold or brass fixtures |
Consider polished porcelain tiles in Carrara variations featuring delicate veining on crisp white backgrounds. These bring airy aesthetics perfect for creating bright, open feels in small or enclosed pantries. Explore our full range of tiles by style to find the perfect match for your design vision.
Stone Look Subway Tiles
Stone look subway tiles offer perfect blends of natural texture and durability. These tiles replicate organic grain and raw beauty of materials like limestone, slate, travertine, and sandstone, bringing character and warmth to pantry backsplashes.
Limestone look tiles offer soft, neutral palettes perfect for transitional and rustic kitchens. Slate inspired tiles in black or deep gray enhance industrial style interiors. Travertine look tiles with warm beige undertones complement Tuscan, Mediterranean, or farmhouse settings, while sandstone look tiles feature soft, linear patterns blending well into modern and earthy design themes. The Natural Stone Institute provides valuable resources on stone characteristics and proper maintenance.
Conclusion
Execute a successful pantry backsplash by combining strategic layout selection, appropriate tile sizing, and thoughtful finish choices. Consider your pantry's specific dimensions, lighting conditions, and daily usage patterns when selecting between classic offset patterns or contemporary herringbone arrangements. For professional installation guidance, the National Kitchen & Bath Association provides certified installer directories to help you find qualified professionals in your area.
Visit our showrooms in Reno, Minden, Fernley, or Sacramento to explore our complete subway tile collection and receive expert design guidance. Take advantage of our $1 sample program with free shipping to test colors, finishes, and textures in your actual lighting conditions before making final decisions. Browse our complete product catalog or learn more about our company and commitment to quality materials. Start your pantry transformation today by visiting Nova Tile and Stone.
Featured Products
Frequently Asked Questions
What is the most popular subway tile layout for pantry backsplashes?
The offset brick pattern remains most popular for pantry backsplashes due to its timeless appeal and forgiving installation. This traditional arrangement staggers each row by half the tile width, creating subtle visual movement while naturally disguising wall imperfections. It performs well in both traditional and modern pantries, requires minimal tile cuts, and pairs beautifully with tile sizes from 3x6 to 4x12 formats. Vertical stacked or herringbone patterns offer striking contemporary alternatives. Visit Coverings, the premier tile industry event, to stay informed about the latest layout trends and innovations.
Should I choose glossy or matte finish subway tiles for my pantry?
Choose glossy finish for dark or windowless pantries where light reflection proves essential. Glossy surfaces resist moisture effectively and clean easily, ideal for beverage stations or food prep areas. Select matte finish for well-lit pantries where glare reduction matters, or when pursuing contemporary, industrial, or farmhouse aesthetics. Matte surfaces hide fingerprints and smudges better than glossy options. Consider satin finish as a middle option balancing light reflection with reduced maintenance. Explore our selection organized by color options to find the perfect finish for your space.
What size subway tile works best for small pantries?
Standard 3x6 inch subway tiles work best for small pantries because they maintain visual balance without overwhelming compact spaces. This classic dimension adapts to multiple layout patterns while preventing excessive grout lines that clutter small areas. Install tiles vertically in stacked or offset patterns to create height illusion. Choose light colors like white, cream, or soft gray to maximize light reflection and enhance spatial perception. Browse our complete tile collection to compare sizes and visualize options for your pantry project.
How do I maintain grout lines on pantry backsplash subway tiles?
Seal grout lines within 48-72 hours after installation using penetrating grout sealer to prevent staining and moisture penetration. Clean grout lines weekly using pH-neutral cleaner and soft brush, avoiding acidic or abrasive products. For stubborn stains, apply baking soda paste, let sit 10-15 minutes, then scrub gently. Reseal grout lines annually in high-use pantries or bi-annually in moderate-use spaces. Consider epoxy grout for pantries with heavy beverage station use, as it resists staining better and requires no sealing. The Tile Council of North America offers comprehensive maintenance guidelines for all tile types.
What factors should I consider when hiring a professional tile installer?
Professional subway tile backsplash installation requires expertise in surface preparation, precise tile alignment, and proper grout application for long-lasting results. Simple offset brick or horizontal straight lay patterns install more quickly than intricate herringbone or basketweave arrangements requiring advanced technical skills. Key factors affecting installation include tile selection (ceramic versus porcelain or natural stone), surface preparation requirements, and pattern complexity. For additional inspiration and design resources, explore terrazzo-look tile options that pair beautifully with subway tile installations.