Cleaning and maintaining pavers involves four core tasks: regular sweeping to remove debris, occasional washing with mild soap and water, prompt stain treatment, and periodic joint sand refreshing to keep the surface stable. These steps apply across paver types, including concrete, natural stone, and clay brick, and across applications such as patios, walkways, driveways, and pool decks, whatever material a project draws from within the full range of paver and exterior stone options available. Consistent upkeep prevents common issues like weed growth, moss, joint erosion, and staining from oil, rust, or organic debris, while optional steps like sealing can add extra protection against stains over time.
Why Regular Cleaning Matters
Pavers sit outdoors year-round, which means they're exposed to dirt, pollen, tree sap, leaves, and whatever the weather brings. Left unaddressed, this buildup can work its way into the surface texture and joints, making stains harder to remove later and giving organic matter like moss and algae a place to take hold. A simple routine of sweeping and occasional washing goes a long way toward keeping a paver surface looking clean and performing well season after season.
Cleaning isn't just about appearance. Debris trapped between pavers can hold moisture against the joint sand, which over time may contribute to shifting or erosion. Staying ahead of buildup helps keep the base structure underneath the pavers more stable.

Sweeping and Removing Loose Debris
The most basic and most important maintenance step is also the simplest: sweep the surface regularly. A stiff-bristled broom removes leaves, dirt, sand, and other loose debris before it has a chance to settle into the joints or get ground into the paver surface by foot traffic.
In the fall, this becomes especially important. Fallen leaves left sitting on pavers can leave behind tannin stains, particularly on lighter-colored stone or concrete pavers. A quick sweep every few days during heavy leaf drop prevents this kind of staining before it starts.
For larger areas like driveways, a leaf blower can speed up debris removal, but a broom still does a better job of clearing fine dirt and sand out of the surface texture.
Washing Pavers the Right Way
Beyond sweeping, an occasional wash keeps pavers looking refreshed. A garden hose with a spray nozzle is usually sufficient for routine cleaning. For dirt that's more stubborn, a mixture of mild dish soap and water applied with a soft-bristle brush works well on most paver materials, including concrete, natural stone, and clay brick.
Pressure washers can be effective for deeper cleaning, but they require some caution. Using too high a pressure setting, or holding the nozzle too close to the surface, can wear down the finish on softer stone pavers or blast out the joint sand between units. If a pressure washer is used, a lower setting with a wide fan tip is generally safer, and it's worth testing a small, inconspicuous area first.
After washing, it's a good idea to let the surface dry completely before walking on it, particularly if the pavers have a smoother or honed finish that may be slippery when wet.
Treating Common Stains
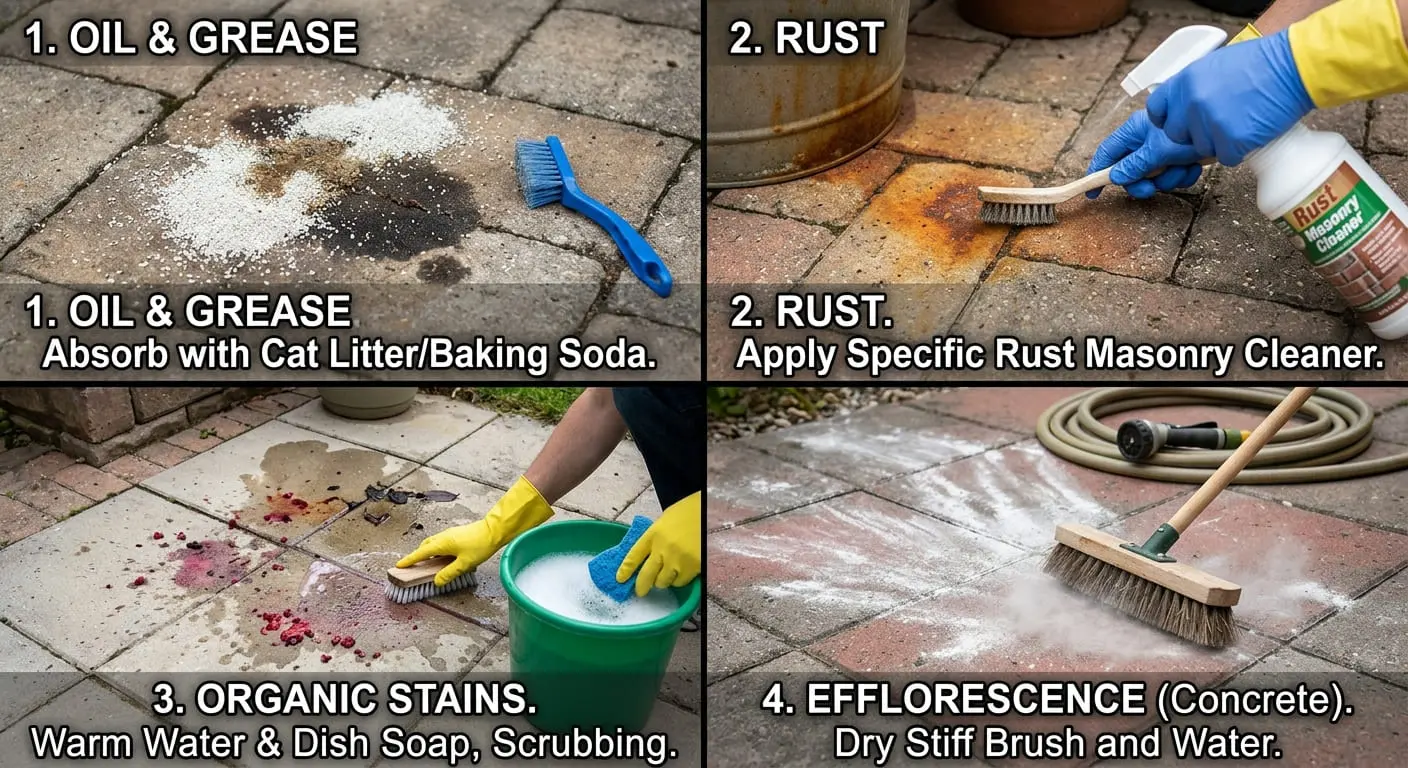
Different stains call for different approaches, and knowing what caused a stain makes it much easier to treat.
Oil and grease stains, common on driveways, respond well to an absorbent material like cat litter or baking soda applied directly to the fresh stain. Letting it sit for several hours or overnight allows it to soak up the oil before sweeping it away and washing the area with dish soap and water.
Rust stains, often from patio furniture or metal planters, typically need a cleaner formulated specifically for rust removal on masonry surfaces, since general soap and water won't lift them.
Organic stains from leaves, berries, or tree sap usually lift with warm water and dish soap, though older, set-in stains may need a bit more scrubbing with a soft brush.
Efflorescence, the white, chalky residue that sometimes appears on concrete pavers, is a natural byproduct of the curing process and moisture moving through the material. It typically fades on its own over time with regular cleaning and weather exposure, and can often be sped along with a stiff brush and water. This is a concrete-specific issue and shouldn't come up on natural stone pavers, which are better cleaned with pH-neutral, stone-safe products rather than any acidic solution.
For any stain, it helps to address it as soon as possible. The longer a stain sits, the more likely it is to set into the surface texture, especially on more porous natural stone options.
Preventing Weeds and Moss Between Joints
Weeds and moss growing between pavers are among the most common maintenance frustrations, but they're also one of the easiest issues to prevent with the right joint material.
Polymeric sand is widely used in paver joints because it hardens once activated with water, creating a bound surface that resists weed germination and washout far better than standard sand. If weeds are already an issue in existing joints, a hand weeder or joint knife can remove them, followed by refreshing the joint sand to help prevent regrowth.
For moss and algae, which tend to show up in shaded or consistently damp areas, a solution of water and mild dish soap scrubbed into the affected joints can help clear it on concrete pavers. On natural stone pavers such as travertine, limestone, or marble, acidic cleaners like vinegar should be avoided entirely, since they can etch and permanently dull the stone's surface; a pH-neutral stone cleaner is the safer choice there. Improving drainage or trimming back overhanging vegetation that keeps an area shaded and damp also reduces how often moss becomes a problem in the first place.
Refreshing Joint Sand Over Time
Joint sand naturally settles and can wash out gradually due to rain, foot traffic, and general weathering. When gaps start to appear between pavers, it's worth topping off the joints with fresh sand to keep the surface stable and prevent shifting.
To refresh joint sand, the area should be swept clean and completely dry, new sand swept into the gaps until they're full, and any excess brushed off the surface. If using polymeric sand, a light misting of water activates the polymers and locks the sand in place. This is generally a task worth doing every couple of years, though high-traffic areas may need it more frequently.
If an entire section of pavers has cracked or faded beyond a simple resand, checking discounted overstock inventory is often a faster way to find matching or complementary material than special-ordering, and seeing color and finish options in person at a nearby showroom can help confirm a close match before buying. Contractors managing joint sand and paver replacements across multiple properties may also find it worth looking into trade account pricing for consistent job-site costs.
Sealing Pavers: What to Know
Sealing is an optional step some homeowners choose to enhance color and make a paver surface more resistant to stains. A sealer forms a protective layer on top of the pavers that can make future cleanup easier, since dirt and spills sit on the surface rather than soaking in.
Not every paver needs to be sealed, and the decision often comes down to the specific material, how the space is used, and personal preference. Sealers also need to be reapplied periodically, since UV exposure and foot traffic gradually wear the coating down. Anyone considering sealing should research products suited to their specific paver material, since formulations vary between concrete, natural stone, and clay options. For those still choosing a paver material for an upcoming project, factoring in long-term upkeep at that stage can simplify maintenance later, and it's a topic worth raising during a design consultation before any material is purchased.

Seasonal Maintenance Checklist
A few habits spread across the year help keep pavers in good shape:
- Spring: Inspect for winter damage, refresh joint sand where needed, and give the surface a thorough wash after months of exposure to snow, salt, or rain.
- Summer: Sweep regularly to prevent dust and pollen buildup, and address any stains from grilling, outdoor dining, or pool use promptly.
- Fall: Sweep frequently to stay ahead of leaf drop and prevent tannin staining.
- Winter: Avoid rock salt or other ice-melting chemicals that can degrade certain paver surfaces over time; sand or a paver-safe de-icer is generally a better choice.
Common Mistakes to Avoid
A few habits can undo the benefits of an otherwise good maintenance routine:
- Using harsh acidic cleaners not formulated for the specific paver material, which can etch or discolor certain natural stone surfaces.
- Pressure washing at too high a setting, which can erode joint sand or wear down softer paver finishes.
- Ignoring small weeds or gaps in joint sand, which tend to expand into bigger issues over time.
- Using rock salt in winter on materials prone to salt damage.
- Letting oil, grease, or organic stains sit for extended periods before treating them.
Conclusion
A little routine care goes a long way toward keeping pavers looking clean and performing well for years. Regular sweeping, prompt stain treatment, and periodic attention to joint sand address most of the wear pavers experience outdoors, and homeowners who stay ahead of small maintenance tasks tend to avoid bigger headaches later on. If questions come up about which paver material or finish might suit a specific project or maintenance routine, our design team is happy to help. Our team can walk through paver options, finishes, and care considerations at showrooms in Sacramento, Reno, Minden, and Fernley for any outdoor space.
Note: Some images on this page may be conceptual renderings created to illustrate design possibilities and may not depict actual installations.
Frequently Asked Questions
Sweeping should happen regularly, ideally weekly or whenever visible debris builds up, while a more thorough wash is generally recommended a few times a year or as stains and dirt accumulate.
Yes, but it's important to use a lower pressure setting and a wide fan tip to avoid eroding joint sand or damaging softer paver surfaces. Testing a small area first is a good precaution.
Weeds typically take root in loose or eroded joint sand where seeds can settle and find moisture. Using polymeric sand in the joints, which hardens once activated, significantly reduces the chance of weed growth compared to standard sand.
Sealing is optional and mainly used to enhance color and add stain resistance. Whether it's worth doing depends on the paver material, how the area is used, and personal preference, and sealed surfaces need reapplication over time as the coating wears.
That residue is called efflorescence, a natural mineral deposit that can appear during curing or after moisture moves through the material. It's not a defect and typically fades with normal weathering, a stiff brush, and water. Acidic cleaners like vinegar should be avoided on natural stone pavers, since they can etch and dull the surface.